

Crustless Asparagus Quiche

During the summer months, my backyard chickens provide plenty of eggs. More eggs, in fact, than our small family can eat for breakfast. Sometimes I give them away to friends and family who can really appreciate fresh, home-grown eggs. The differences between eggs from factory-farm hens and those from free ranged hens is staggering. The color of the yoke alone is more pleasing to the eye. And that taste...if you have never tasted a fresh egg, well, then, you are missing out! One way to use our over abundance of eggs is in a quiche. One of the most versatile dishes to make, you can substitute any vegetable that's on hand, and it will still taste great! I happened to have some asparagus that needed to be eaten, plus some eggs, and the result was this quiche! I made two, and was glad I did, because the first one was eaten really quick! Back in the day, when I wasn't as health conscience, I made a cream cheese crust. I'm really not sure why I did exactly, except that was what the recipe called for, and I was a recipe follower! It was tasty, but not worth all the fat and calories. Now that I've been making crustless quiches for so long, I sort of forget most still are made with one. Believe me, you won't miss the crust or the calories in this recipe!
Crustless Asparagus Quiche
- 2 cups of asparagus, cut in 1-inch pieces
- 1 small onion, diced
- 1/2 tsp no-salt seasoning
- 1 cup milk or non-dairy milk
- 1/4 cup all-purpose flour or almond flour (if gluten-free)
- 5 large eggs
- 1/3 cup cheddar cheese (non-dairy cheese, if vegan)
- 1/4 cup Parmesan cheese (non-dairy cheese, if vegan)
Directions:
- Preheat oven to 350º F. Lightly oil quiche or pie pan.
- In a skillet add 2 TBSP water along with cut asparagus, diced onion and no-salt seasoning. Sauté over medium heat, until soft, about 5 minutes. Drain and place in prepared dish.
- In a blender, add milk, flour, and eggs. Blend until smooth and consistent in color.
- Pour egg mixture over vegetables.
- Combine cheddar and Parmesan cheeses and sprinkle over quiche.
- Bake for 35-40 minutes or until knife inserted in center comes out clean.
Serves: 4-6

Thai Fried Rice

Fried rice is yummy anytime of year! This version is full flavored with nutritious cabbage, garlic, onions and peppers! Most recipes call for cold rice, which needs to be planned in advance, however, this is the exception. Enjoy!
Ingredients:
- 1 cup chopped onions
- 3 garlic cloves, minced or pressed
- 3-4 TBSP Thai Curry Paste
- 1 TBSP canola oil
- 1 cup peeled and diced carrots
- 2 cups finely chopped Chinese cabbage
- 1 cup diced red bell peppers
- 5 cups cooked rice
- ½ cu diced tomatoes
- 1 cup mung bean sprouts
- 3 TBSP soy sauce (I use Bragg Liquid Aminos)
- 2 TBSP chopped fresh mint
- 2 TBSP chopped fresh cilantro or basil
Directions:
Press garlic cloves and set aside.
Prepare rice: In a large pot, bring 3 1/4 cups water and 1 1/2 brown rice, 1 tsp salt to a boil. Simmer until all liquid is absorbed, about 20 minutes.
While the rice is cooking, prepare onions carrots, cabbage, bell peppers, tomatoes, and bean sprouts for wok.
In a large nonstick skillet, sauté the onions, garlic, and curry paste in the oil for about 5 minutes. Add the carrots and cabbage, cover and cook for 5 minutes, stirring occasionally. Add the peppers, cover, and cook for 3-4 minutes, until the vegetables are just tender. Stir in the rice, tomatoes, sprouts, and soy sauce and cook, stirring constantly, until the rice is heated through. Add the mint, cilantro or basil and, if desired, additional soy sauce or curry paste.
Serves: 4-5
Total time: 45 minutes
From Moosewood Restaurant Low-Fat Favorites

Spicy Thai Tofu

Last summer, I had Thai peppers growing in a bucket on my deck. It's amazing how many of these little guys are produced by one plant! As a way of using them, my family has been experiencing more Thai food. What's even better it how quick a meal can be prepared with minimal heating of the kitchen. I don't know about you, but when these hot August days don't encourage me to cook or bake. Heating up the kitchen means my A/C is going to have to work overtime.
If you are not a fan of tofu, feel free to substitute shrimp or chicken in it's place. Allow more cooking time, obviously. If you don't have fresh Thai peppers growing, you can substitute crushed red pepper.
Spicy Thai Tofu
2 TBSP olive oil 2 large red bell peppers, seeded, thinly sliced 3 TBSP minced, peeled fresh ginger 3 large garlic cloves, finely chopped 14-16 ounces extra firm tofu, drained well, cut into 1-inch cubes 3 green onions, thinly sliced 3 TBSP soy sauce 2 TBSP fresh lime juice 4 Thai chili peppers, chopped 1 (6 ounce) bag baby spinach leaves 1/3 cup chopped fresh basil 1/3 cup lighly dry roasted salted peanuts
Directions:
Heat oil in wok over high heat
Add bell peppers, ginger, and garlic; sauté until peppers begin to soften, about 2 minutes
Add tofu (or other protein) and green onions; cook 2 minutes
Add next 3 ingredients; toss to blend, about 1 minute
Add spinach in 3 additions, tossing until beginning to wilt
Mix in basil
Season with salt and pepper
Serve in individual bowls and sprinkle with peanuts
Serve with rice if desired
Serves: 4 Ready in 30 minutes

Meatless Pasta Balls
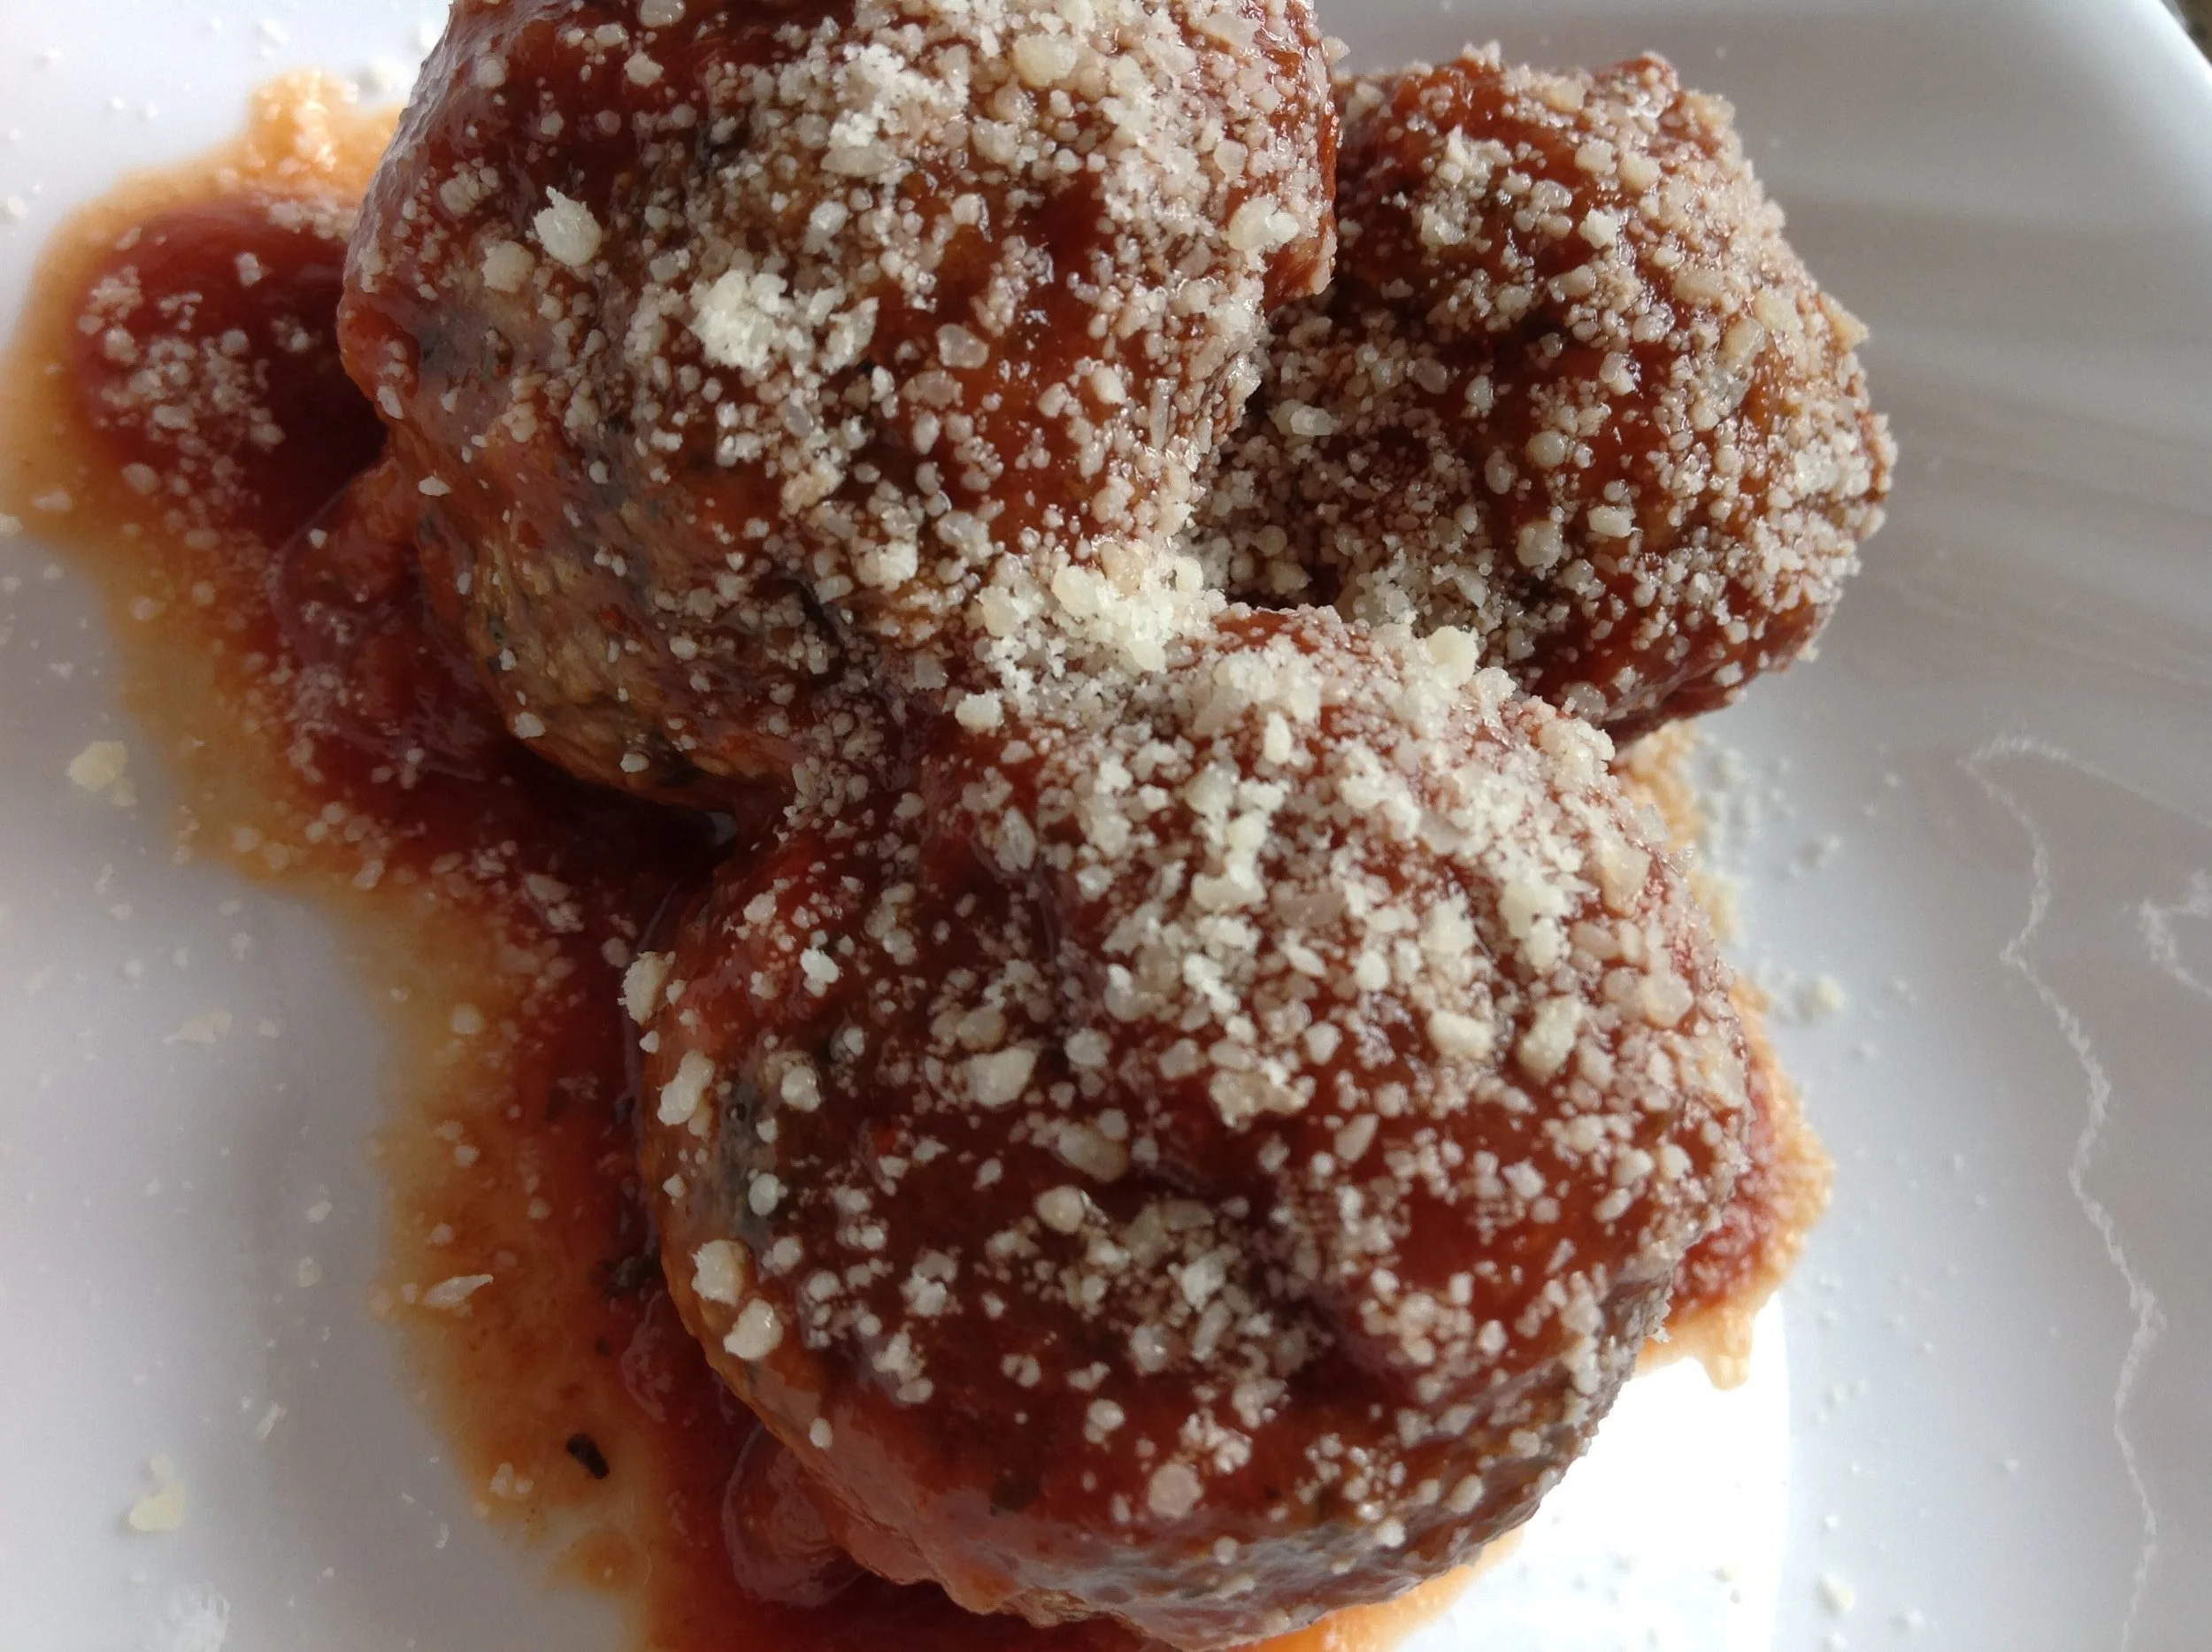
Meatless Pasta Balls
I have tried many different recipes for meatless meatballs. Most were failures; mainly because the consistency was not strong enough to withstand being mixed in with the sauce. This one is an exception! The consistency in this recipe is very close to regular meatballs. Plan ahead, though; it's best to let this mix sit overnight and bake the next day. Double the batch and freeze some for later!
Ingredients
- 4 cloves garlic, minced
- 1 TBSP olive oil
- 1 pound fresh mushrooms, finely chopped
- 1 pinch salt
- 1 TBSP butter
- 1/2 cup finely chopped pungent onion
- 1/2 cup quick-cooking oats
- 1 ounce* very finely shredded Parmigiano-Reggiano cheese
- 1/2 cup bread crumbs
- 1/4 cup chopped Italian parsley, packed
- 1 egg
- 1 tsp salt
- 1/4 tsp ground black pepper
- 1/8 tsp cayenne pepper
- 1/8 tsp dried oregano
- 3 cups marinara
- 1 TBSP very finely shredded Parmigiano-Reggiano cheese
- 1 TBSP chopped Italian parsley
Directions:
1. Mince or press garlic and set aside.
2. Heat olive oil in a skillet over medium-high heat. Add mushrooms to the oil and sprinkle with salt. Cook, stirring occasionally, until liquid from mushrooms have evaporated. Stir in butter and reduce heat to medium. Cook until mushrooms are golden brown, about 5 minutes.
3. Stir onion into mushrooms and cook, stirring often, until onion is translucent, about 5 minutes. Remove skillet from heat, add pressed/minced garlic, stirring until fragrant, about 1 minute. Transfer mixture to a mixing bowl.
4. Mix oats into mushroom mixture until thoroughly combined. Gently stir 1 ounce Parmigiano-Reggiano cheese into mixture. Add bread crumbs, 1/4 cup parsley, and egg; season with salt, black pepper, cayenne pepper, and oregano. Mix together with a fork until crumbly. Mixture should hold together when pressed. If mixture is too dry, you may add another egg.
5. Cover bowl with plastic wrap and refrigerate at least 4 hours or overnight for best flavor and texture.
6. Preheat oven to 450º F. Line a baking sheet with parchment paper or a silicone baking mat.
7. Form mixture into small meatballs using 2-TBSP scoop. Roll meatballs lightly between your hands until smooth. Arrange meatballs on a prepared baking sheet.
8. Bake until meatballs are lightly golden brown, 12-15 minutes.
9. Bring pasta sauce to a boil in a large saucepan; reduce heat to low. Gently stir meatballs into sauce until coated. Simmer meatballs in sauce. Transfer to a bowl and garnish with 1 TBSP cheese and 1 TBSP parsley.
*1 ounce equals about 1/4 cup, but using the weighted measurement works better with this recipe.
adapted from Allrecipes

Armenian Lentil Soup
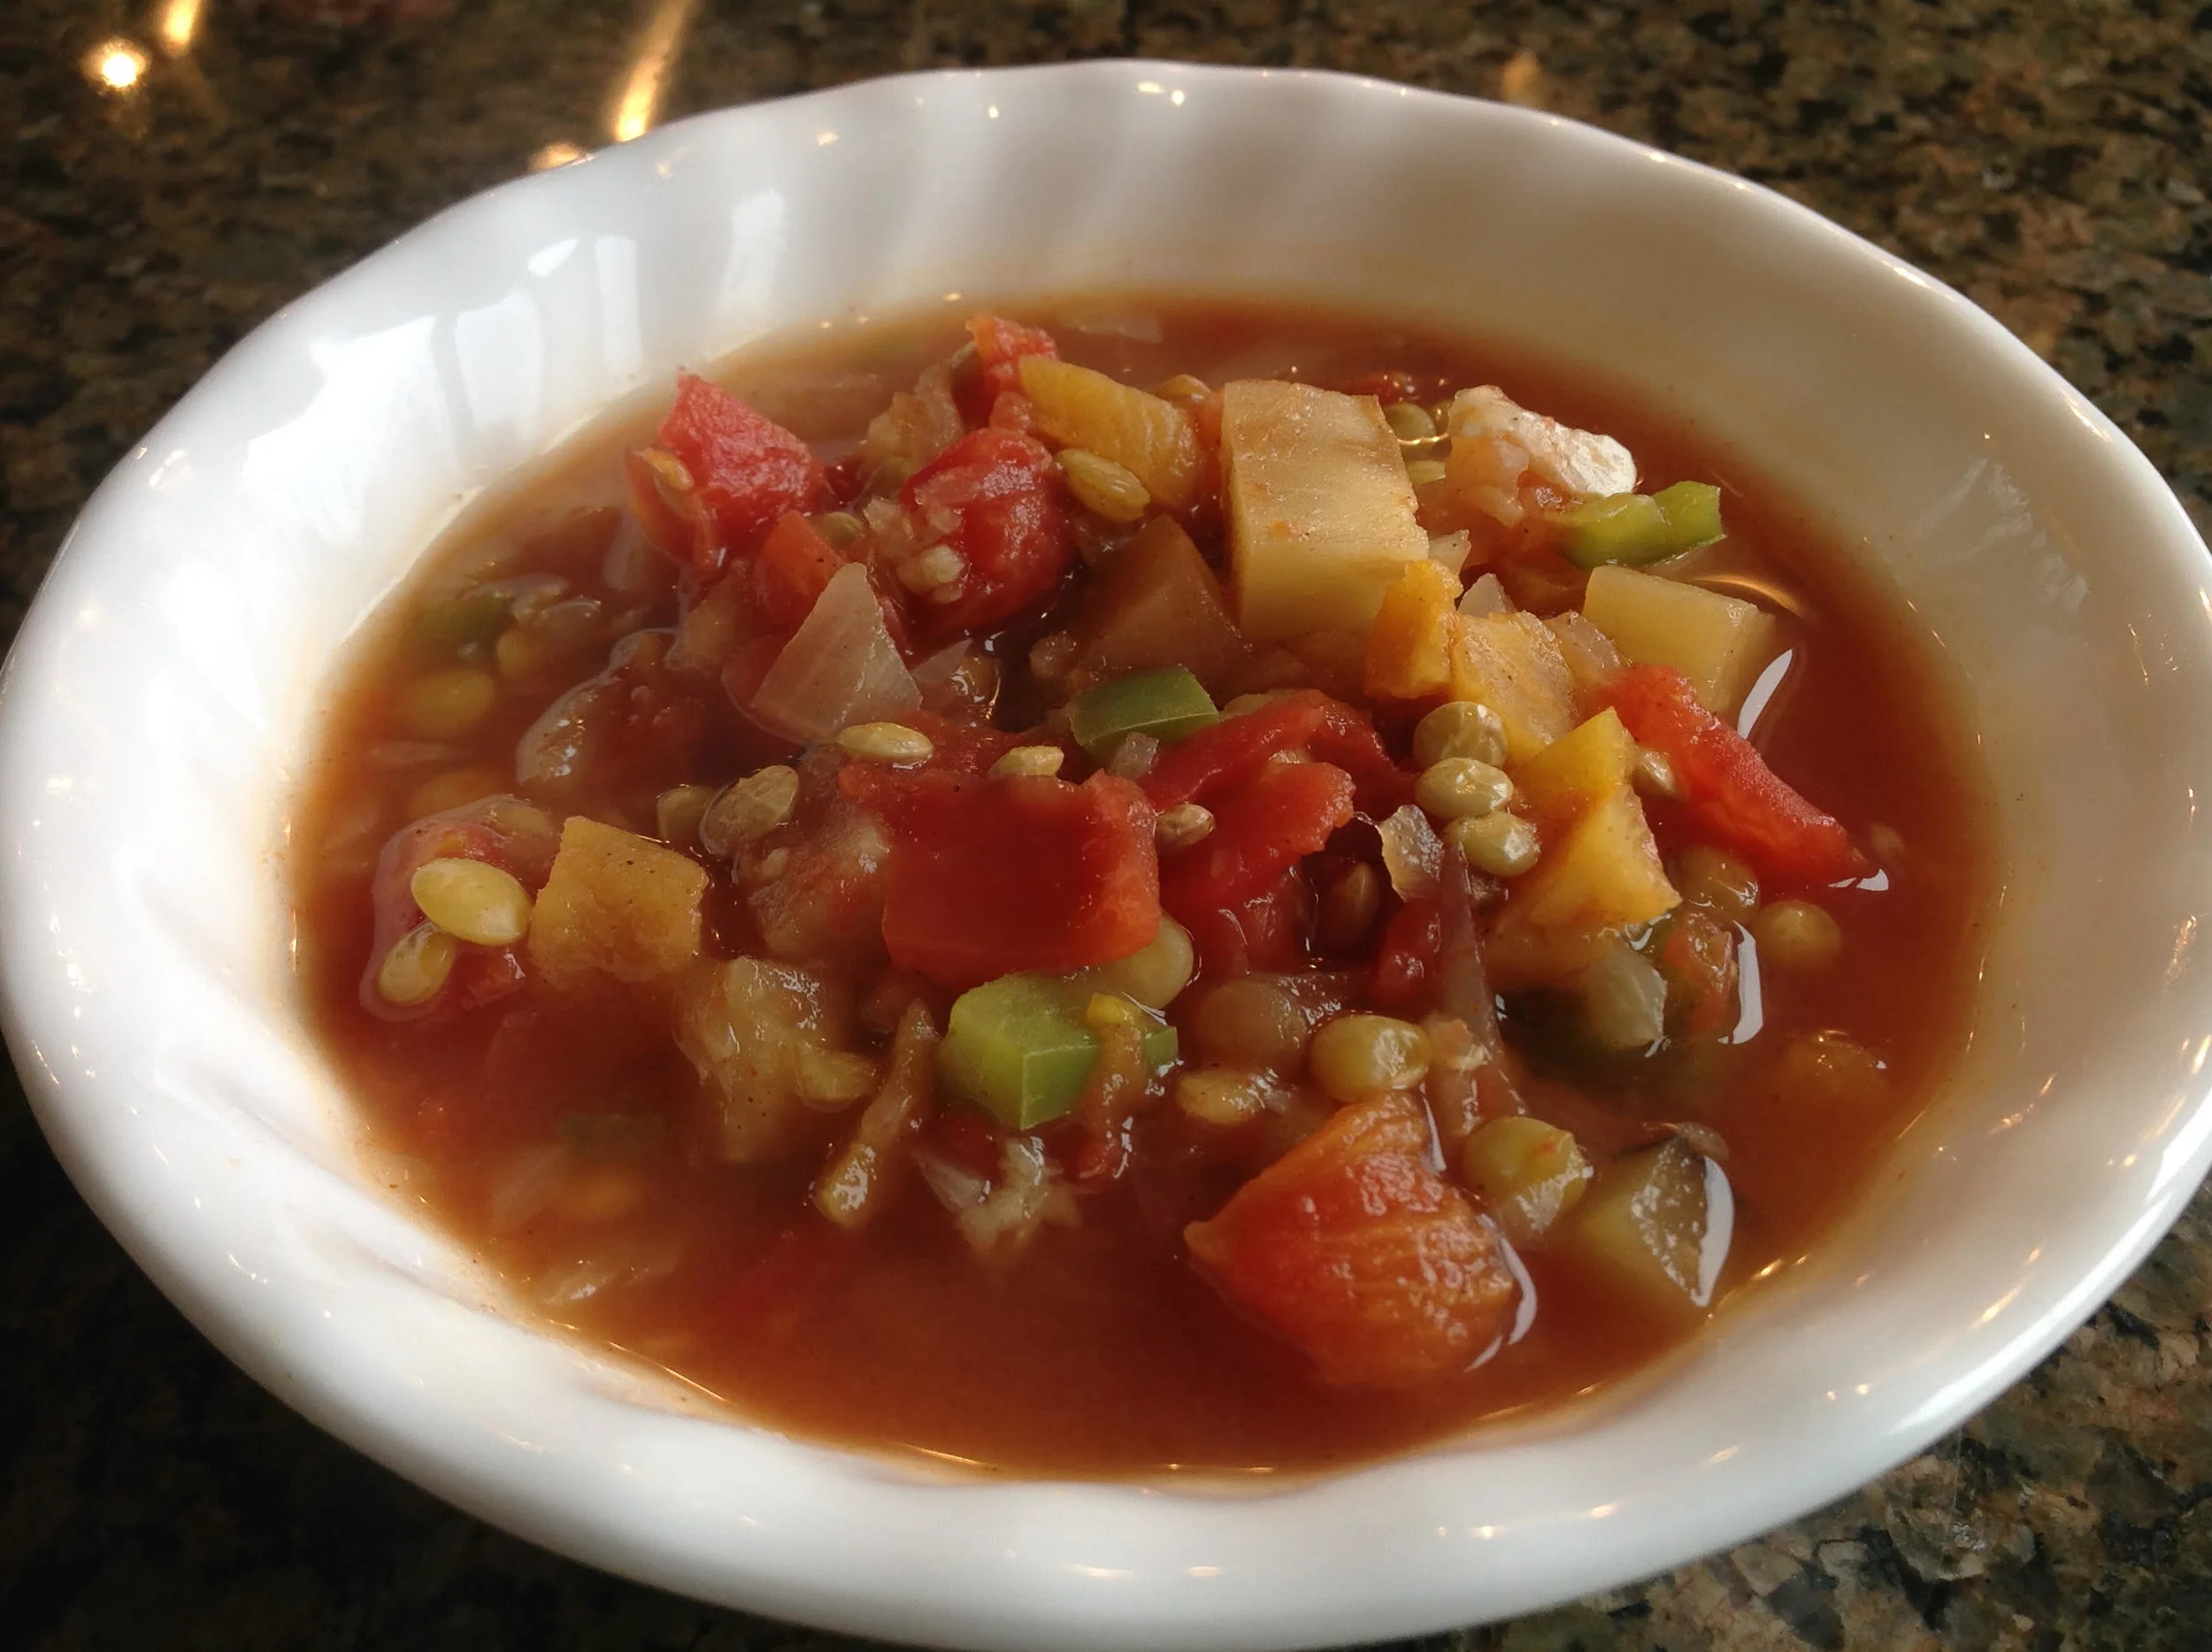
Lentils are not peas or beans but close cousins of the two. All varieties of lentils are very high is phytonutrients, however, some are even better. The tan-colored lentils are an excellent choice, but others are still better. The black lentils are the most nutritious, but are difficult to find in the supermarket. The next variety of nutrition is French (or green) and then red.
They are the heroes of the nutrition world. Inexpensive and versatile, lentils are rich in protein and fiber but low in fat. They are a good source of vitamins and minerals. As a low glycemic index food, lentils are also an ideal source of slow-burning energy that may have additional benefits to human health. Try the lentil loaf for another nutrient packed recipe.
According to the Glycemic Index Foundation, if you have diabetes, lentils are one food you should learn to love. Dietitians report that no matter how much of them you eat, they have only a small effect on the blood glucose levels. Lentils are great for everybody, not just people with diabetes. Rich in protein, high in fibre and packed with nutrients like B vitamins, folate and minerals, this little nutritional giant fills you up. They are also gluten free, easy to prepare (no soaking), quick cooking (15–20 minutes) and inexpensive (so great for feeding the family). All colours and types of dried lentils have a similar low GI value. Although opting for handy canned convenience increases the GI somewhat, lentils are still a very smart carb choice.
GI 26 (red, home cooked)
GI 30 (green, home cooked)
GI 52 (green, canned)
Armenian Lentil Soup
Prep time 30 min Total Time 1 hour Serves: 4
Ingredients
- 1-2 medium garlic cloves
- 1 cup dried lentils, preferably black, green or red
- 4-5 cups low sodium vegetable broth
- 1/2 cup coarsely chopped dried apricots
- 3 TBSP extra virgin olive oil
- 1/2 cup chopped pungent red or yellow onion
- 1 red, green, yellow, or orange bell pepper, diced into 1/2-inch pieces
- 3 1/2 cups chopped fresh tomatoes, with their seeds, or 1 28-ounce can diced tomatoes, undrained
- 1 medium unpeeled eggplant, cut into 1/2-inch cubes
- 1 TBSP dark brown sugar, firmly packed
- 1 TBSP vinegar
- 1/2 tsp ground cinnamon
- 1/4 tsp ground allspice or ground cloves
- 1/4 tsp cayenne pepper, or more or less to taste
- 1 tsp salt, or more or less to taste
- 4 TBSP chopped Italian parsley or chopped fresh mint for garnish
Directions:
- Push the garlic through a garlic press and set aside.
- Rinse the lentils and put them in a large pot.
- Add 4 cups broth and the apricots, bring to a boil, then cover and reduce the heat to low.
- Simmer while you prepare the remaining ingredients, about 20 minutes.
- Heat the olive oil in a large saucepan over medium heat. Add the chopped onions and sauté 4-5 minutes, or until the onions are translucent. Add all remaining ingredients except the herbs. Bring to a simmer, cover, and cook for 10 minutes.
- Add the vegetable mixture to the lentils and simmer for another 30 minutes, or until the lentils are tender. Adjust the seasonings. If the soup is too thick, add more broth.
- Ladle the soup into large bowls, garnish with the chopped herbs and serve.
Variations: Sprinkle the soup with a small amount of orange zest. Substitute chopped chives or cilantro for the parsley.

Falafel with Quinoa
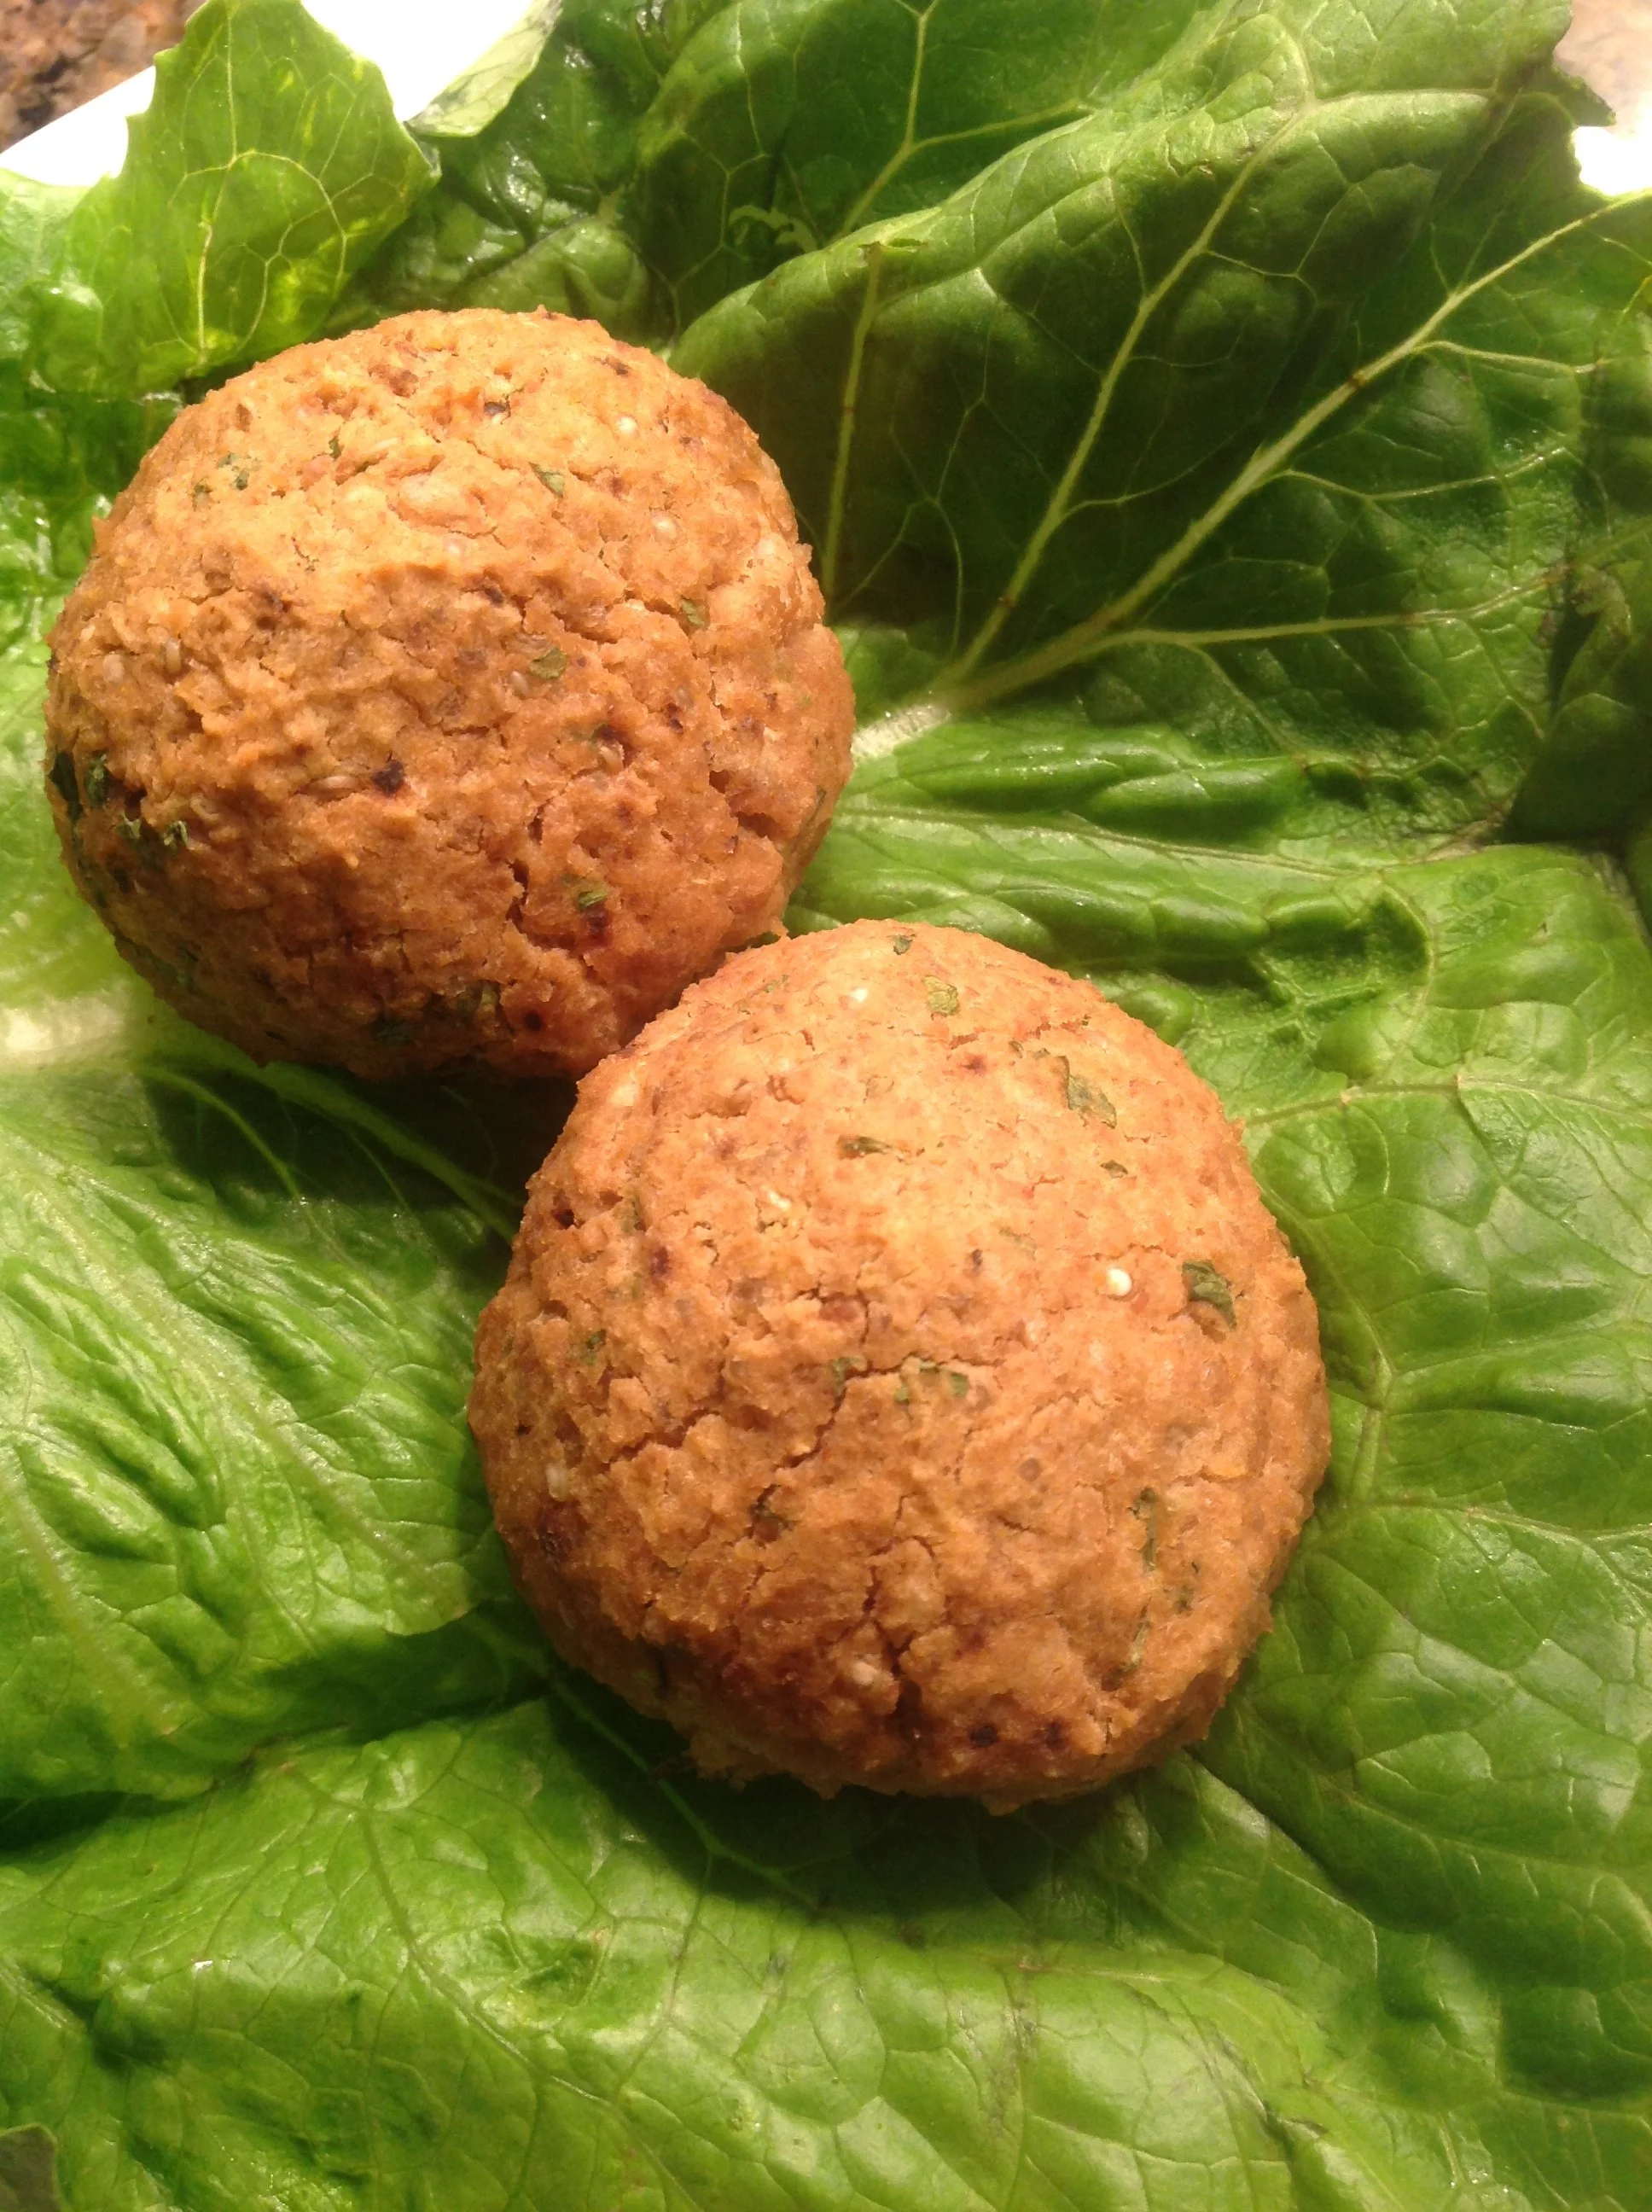
The Mediterranean restaurant nearest my home serves delicious falafel. Since eating there, I've been on the lookout to find a recipe that is comparable. Even though the restaurant fries their falafel, the texture of these baked ones gives the feel of fried without the extra calories.
Baked Falafel
- 2 cups cooked chickpeas
- ½ large onion, roughly chopped
- 2-3 garlic cloves, peeled and roughly chopped
- 2 tsp. cumin
- ½ lemon, juiced
- 2 TBSP olive oil
- ½ tsp. each salt and pepper
- 1 tsp. baking soda
- 1 cup cooked quinoa
- 1 TBSP sesame seeds (optional)
Directions:
- Preheat oven to 375 degrees F, line a baking sheet with parchment.
- In a food processor, add the chickpeas, onion, lemon juice, garlic, cumin, salt, pepper, olive oil, baking soda and sesame seeds. Pulse until you have a thick paste, without almost any chunks.
- In a large mixing bowl, add the chickpea mixture, quinoa, and parsley. Stir together until evenly combined.
- Form the falafels with your hands by taking about 2 TBSP of the mixture at a time. Gently roll it into a ball, and place it on the baking sheet. Continue with the rest of the batter.
Bake for 30 minutes in the oven, until lightly browned and slightly crispy on the outside.
Serve with aioli sauce.
Aioli sauce
Ingredients:
- 2 garlic cloves, pressed
- ¼ tsp. coarse salt
- ½ cup mayonnaise
- 2 TBSP olive oil
- 1 TBSP fresh lemon juice
Combine all ingredients in a small bowl. Whisk until well mixed. Serve immediately and store any leftovers promptly in the refrigerator.
Adapted from myfitnesspal.com

Pumpkin Bread (a lighter version)
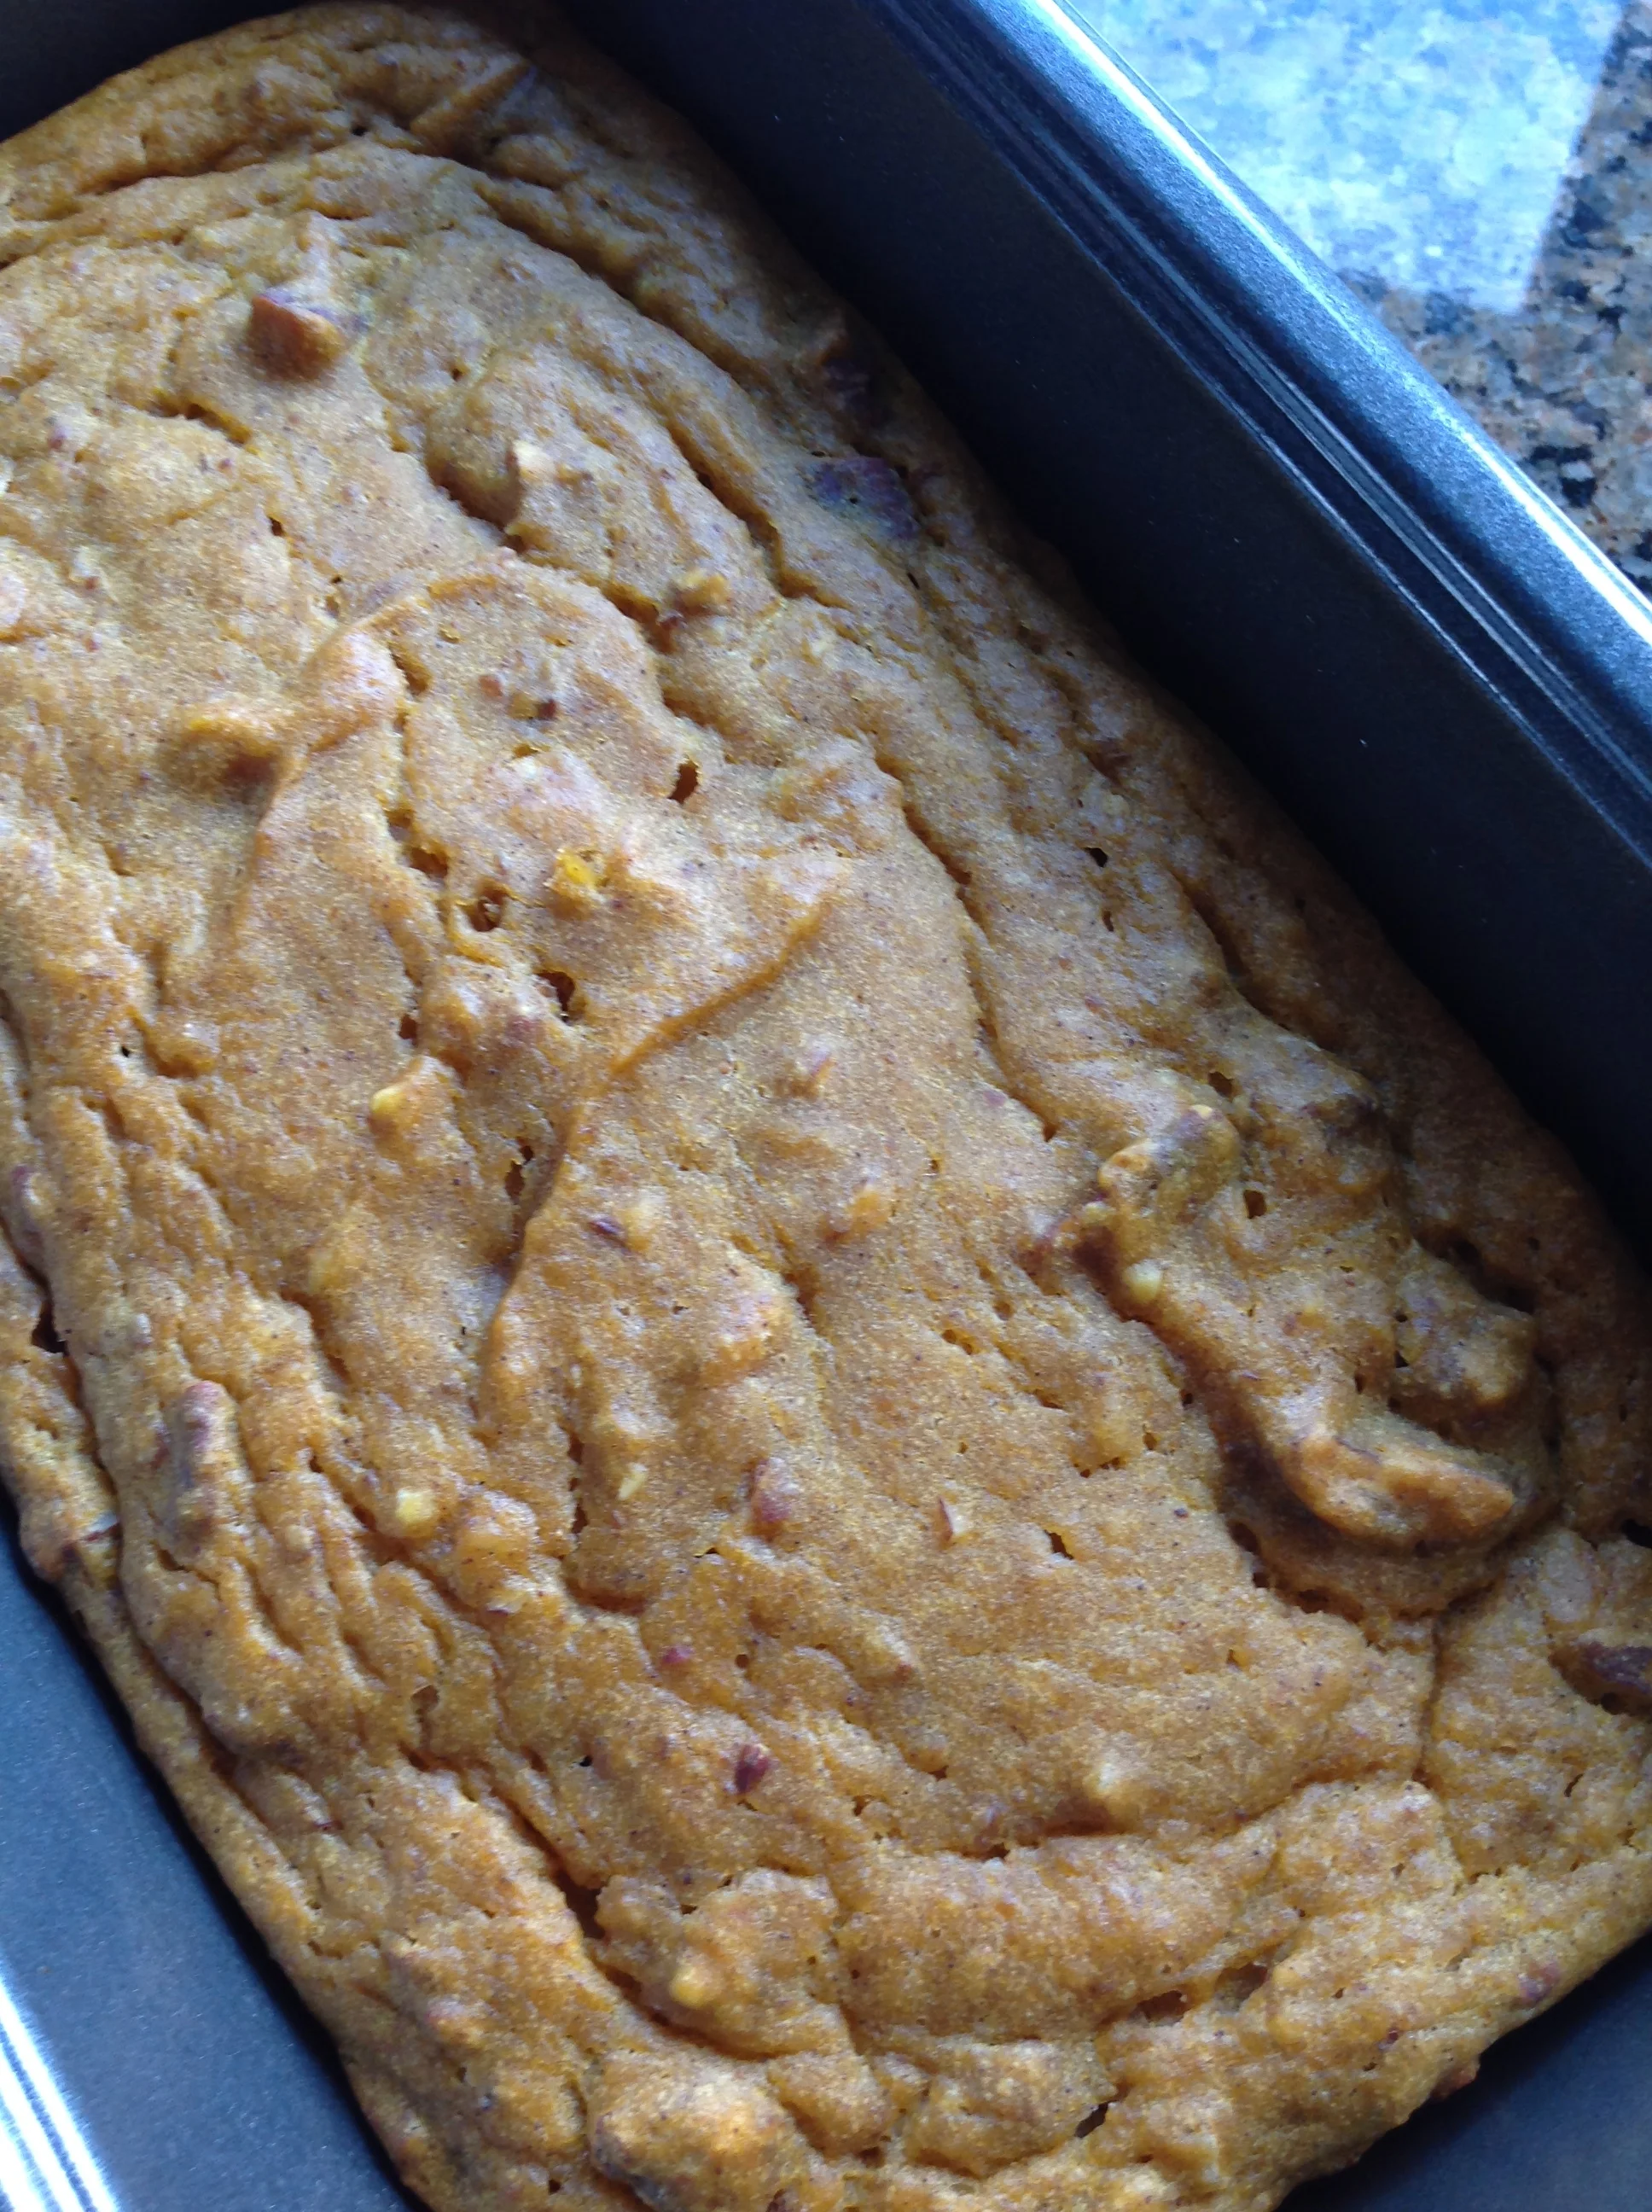
In the summer, I make zucchini bread often as a way to make use of the over abundance of this multi-purpose vegetable. Occasionally, I’ll over purchase bananas leaving me some less desirable, soft, brown fruit. At that time, I’ll whip up some oatmeal banana bread. Scrolling around on the Internet, I ran across a pumpkin bread recipe but the sugar and oil levels were too high for my liking. Instead, I created a version that both lower in sugar and fat. Thankfully, I doubled the recipe because our family ate the first loaf in a matter of minutes. I quickly froze the second before it met the same demise.
Pumpkin Bread
- 1 ½ cups flour
- ½ tsp. salt
- ½ cup sugar or xylitol*
- 1 tsp. baking soda
- 1 tsp. ground ginger
- ½ tsp. cinnamon
- ½ tsp. nutmeg
- ½ tsp. allspice
- 1 cup pumpkin puree
- ½ cup unsweetened applesauce
- 2 TBSP oil
- 2 eggs, beaten
- ¼ cup water
- 2 tsp. molasses
- 1 tsp. orange zest (optional)
- ½ cup chopped pecans or walnuts (optional)
Directions:
- Preheat oven to 350 . In a large bowl, whisk together the flour, salt, baking soda, ground ginger, cinnamon, nutmeg, and allspice.
- In a separate bowl, mix together the pumpkin puree, the melted better, beaten eggs, ¼ cup of water, molasses, and orange zest (if using). Add the dry ingredients to the wet ingredients and stir until just combined and there is no more dry flour in the batter. Do not over mix batter. Stir in nuts.
- Butter the insides of a 8x4x3 inch loaf pan. Pour the batter into the pan and smooth the top. Bake for 45-50 minutes or until the toothpick comes out clean from the center of the loaf.
- Remove from the oven and let cool in the pan for about 5 minutes. Loosen from the pan and remove.
Yield: 1 loaf
*Xylitol is a natural sugar substitute that can be used. It has many healthful benefits.

Blueberry Banana Baked Oatmeal

Oatmeal has many qualities that lend itself to be deemed a healthy food. Unfortunately, most of us tend to add so many unhealthy ingredients, it's no longer considered healthy. In this version, there is no added sugar. The bananas and blueberries add enough sweetness for my taste, but if you have a sweet tooth, you may need to add a sweetener. If this is the case, add 1/4 cup of maple syrup into the wet ingredients. Don't be surprised when it disappears so quickly. I double the recipe and heat up the leftovers the next morning. You can also add it to your smoothie for some added goodness!
BLUEBERRY BANANA BAKED OATMEAL
- 2 ripe bananas, sliced
- ¾ cup fresh or frozen blueberries
- 1 cups rolled old fashioned oatmeal
- ½ tsp. cinnamon
- ½ tsp. baking powder
- ¼ tsp. salt
- 1 cup milk (I use almond milk)
- 1 egg
- 3 TBSP coconut oil, melted
- 1 tsp. vanilla
- ¼ cup walnuts
Directions:
- Preheat oven to 375 degrees. Grease a 1-1/2 quart casserole dish.
- Lay the bananas in a single layer in the bottom of the dish. Sprinkle ½ cup of the blueberries over bananas.
- In a bowl, combine the oats, cinnamon, baking power, and salt. Stir and sprinkle over fruit.
- Whisk milk, egg, oil, (maple syrup, if using) and vanilla. Pour over oats, coating evenly. Sprinkle remaining blueberries and walnuts over top. Bake for 35-45 minutes or until golden and bubbly and set in the center.
Serves: 4
Adapted from alaskafromscratch.com

Lentil Rice Veggie Loaf
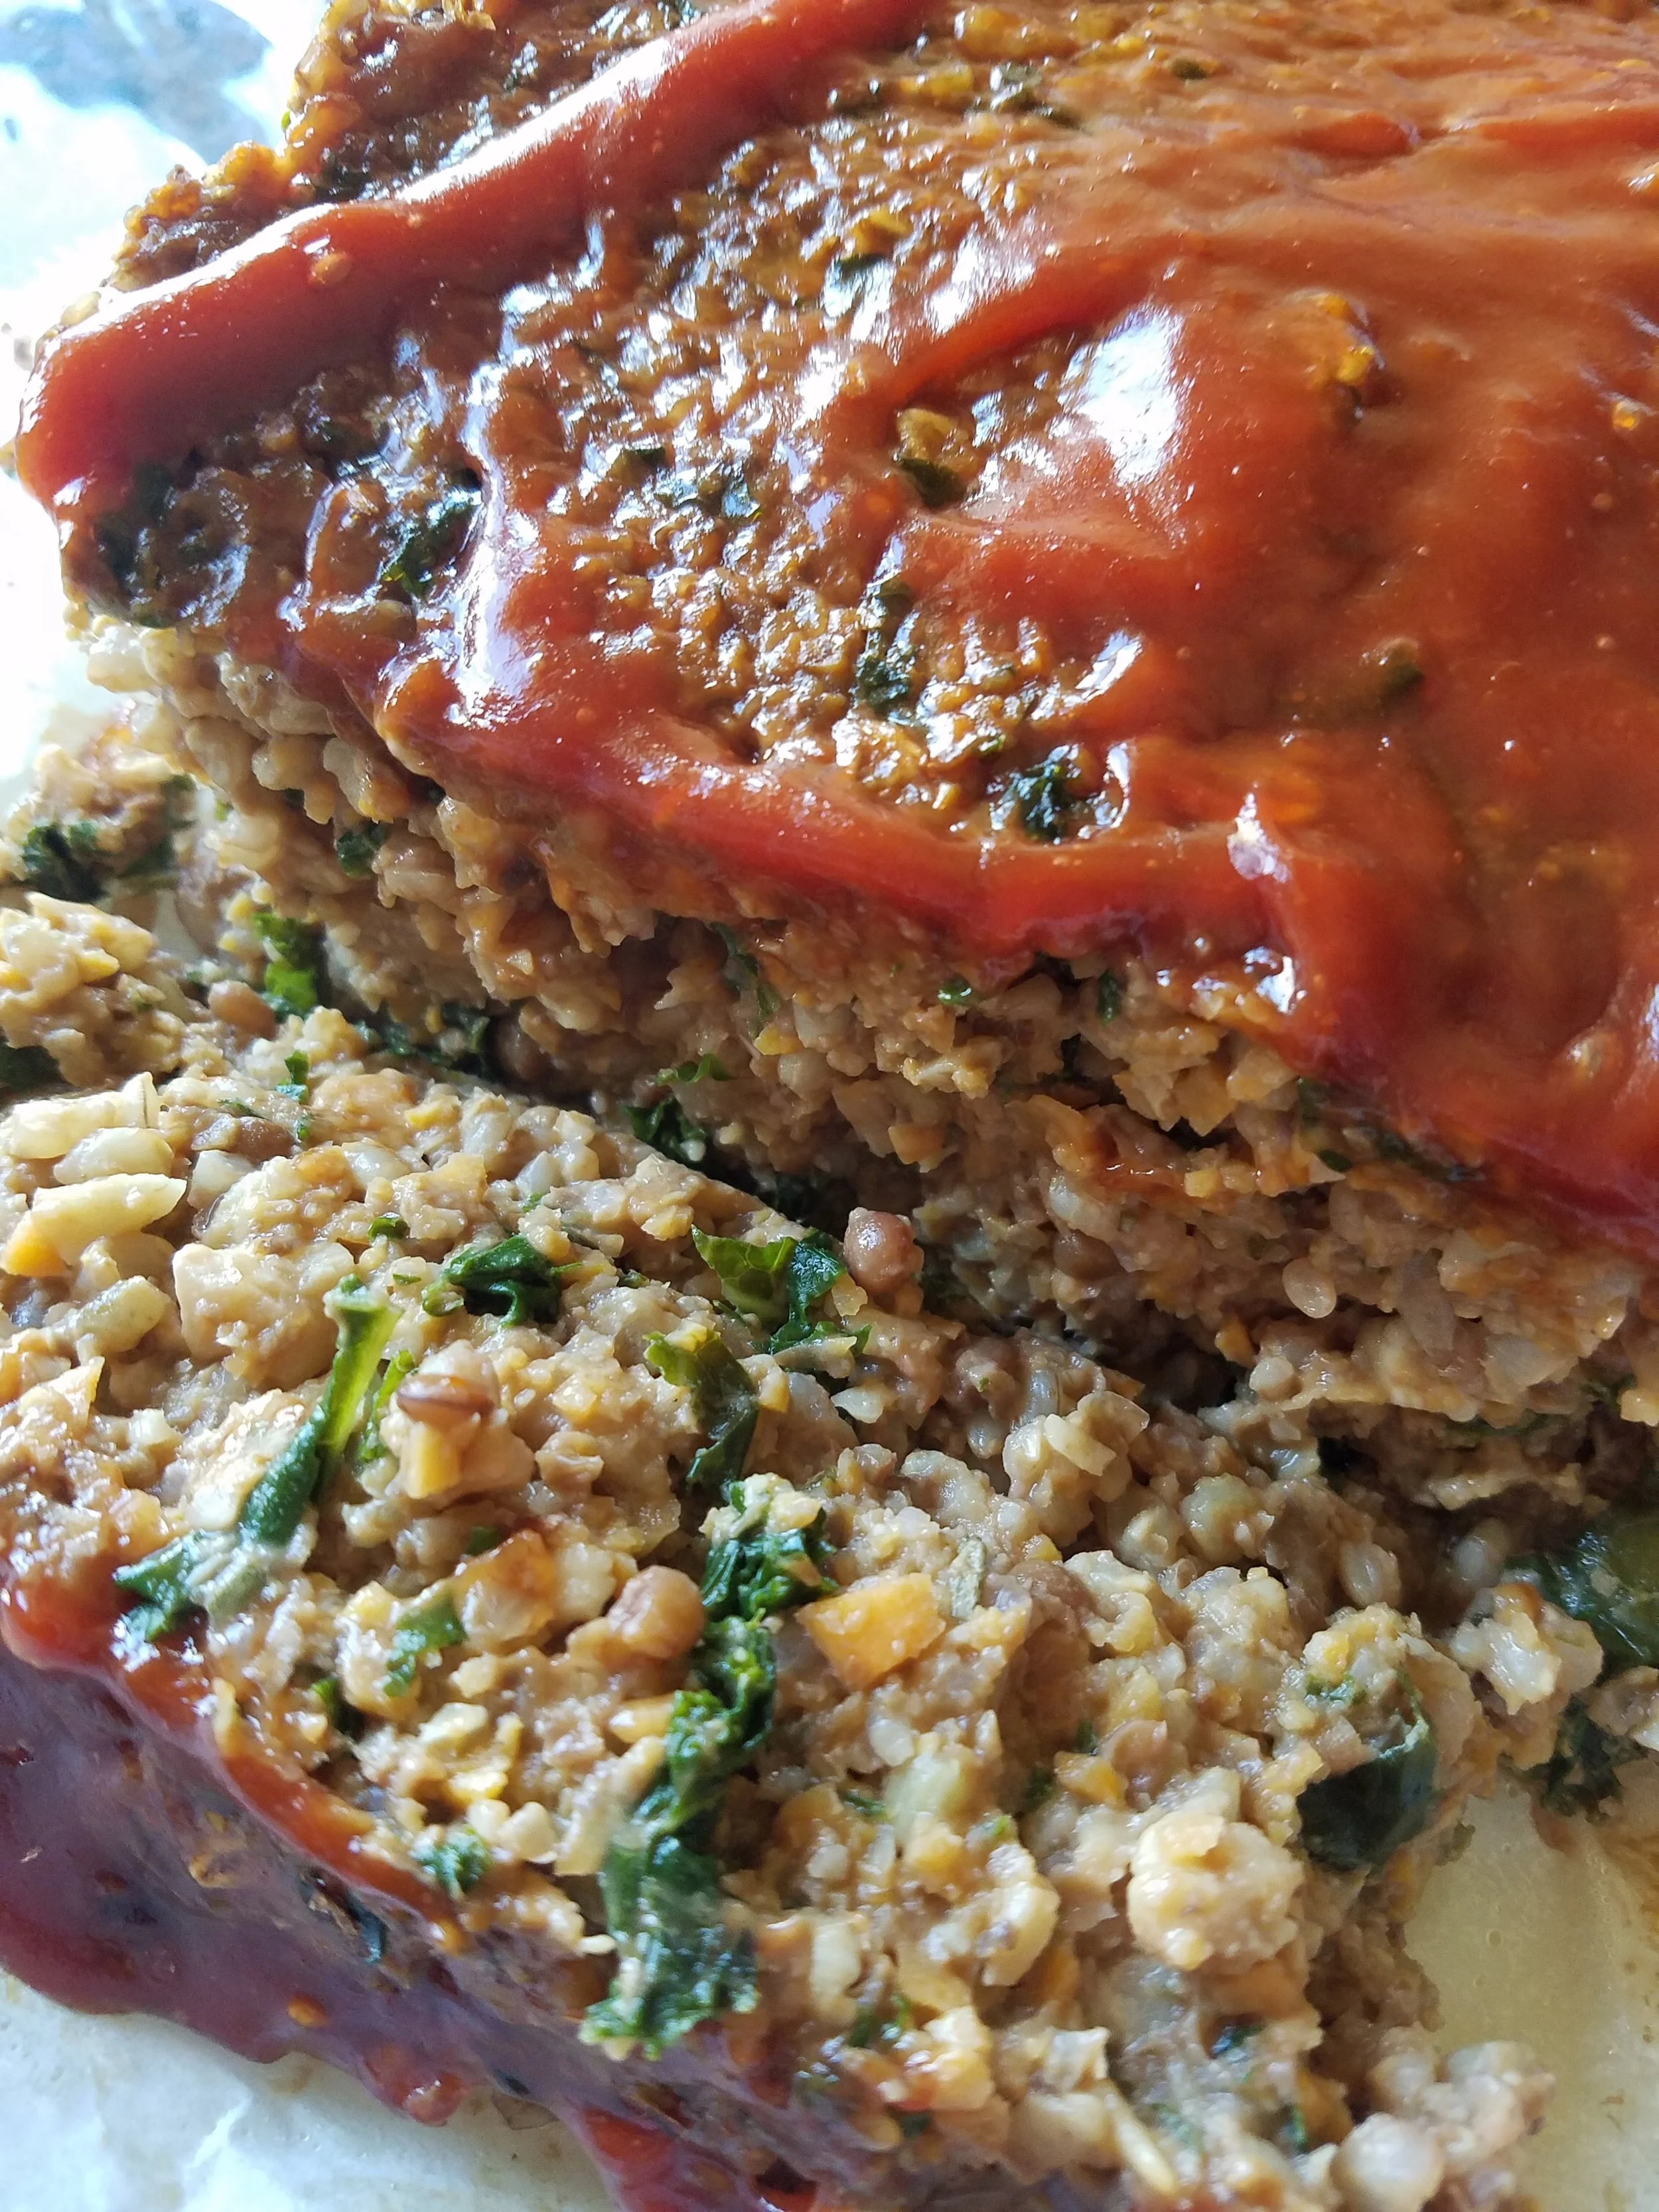
During the winter months, it's great to enjoy warm foods. For those who want a different approach to the standard meatloaf, this recipe can fill in the gaps. Full of fiber, protein, and veggies, it's sure to please the family. A gluten-free food, it's actually better the next day as all those flavors "get to know" each other better. Don't be over whelmed with the ingredient list and directions. It actually flows quite well. Serve with mashed potatoes, green beans and a garden salad.
Lentil Rice Veggie Loaf
- 2/3 cup uncooked green lentils, rinsed and drained
- 1/3 cup short grain brown rice
- 1 cup finely chopped walnuts
- 2 cups water
- 2 cups low sodium vegetable broth
- 1 TBSP + 2 tsp sunflower oil
- 1 1/4 cup diced yellow onion
- 4 tsp minced garlic
- 1 1/2 cups grated sweet potato
- 1 cup diced baby mushrooms
- 2 cups loosely packed shredded curly kale
- 1 1/2 tsp dried parsley
- 1 1/2 tsp ground dried rosemary
- 1/2 tsp dried thyme
- 1/2 cup partially ground gluten-free rolled oats
- 1/2 cup almond meal
- 1 TBSP gluten-free Worcestershire sauce
- 2 large eggs, whisked
- salt and pepper, to taste
for the glaze
- 3/4 cup ketchup
- 1 tsp Worcestershire sauce
- hot sauce, to taste
Directions
Place lentils, rice, water and veggie broth in a medium pot and bring to a boil over high heat. Reduce heat to a constant simmer and keep uncovered. Stir every few minutes and let cook for about 40 minutes until nearly all but 1-2 tablespoons of liquid has been absorbed and lentils and rice are tender.
Meanwhile, preheat the oven to 300º F. Toast walnuts on a baking sheet for 12-15 minutes until light golden brown. Set aside.
While walnuts toast, heat a large pan over medium heat with 2 teaspoons of oil. Place onion in the pan with a big pinch of salt and cook until softened and translucent, 6-8 minutes. Stir frequently. Then stir in the garlic and let cook for 1 minute. Stir in sweet potato and let cook for about 5 minutes. Next, add in the mushrooms and cook for 2-3 minutes. Then add in the kale and cook until just starting to wilt, 2-3 minutes. Stir frequently for all additions. Next, stir in the herbs and let cook for 1 minute. Set mixture aside.
Preheat oven to 350º F and line a 9x5 or 8x4 bread pan with parchment on all sides (do not skip).
Mix sauce ingredients together and set aside.
Once the lentil and rice mixture is done, place half of the lentils and rice in a food processor. Pulse until broken down and thick but not fully pureed. Add this to your pan of vegetables along with the rest of the lentils and rice, walnuts, ground oats, and almond meal. Sprinkle on a generous 1/2 teaspoon of salt and 1/4-1/2 teaspoon black pepper. Add the Worcestershire sauce and remaining 1 tablespoon of oil. Mix well to combine. Taste and add more salt to your liking.
Stir in whisked eggs until full incorporated. Spoon mixture into the lined bread pan and pack down firmly. Spread about 1/3 of the sauce on top and bake for 35-40 minutes for the 9x5 or 40-45 minutes for the 8x4.
Let cool and firm up in the pan for 15 minutes. Remove carefully by the parchment paper and transfer to a cutting board. Gently slice with a sharp, serrated knife. Serve with extra sauce on the side.
from edibleperspective.com

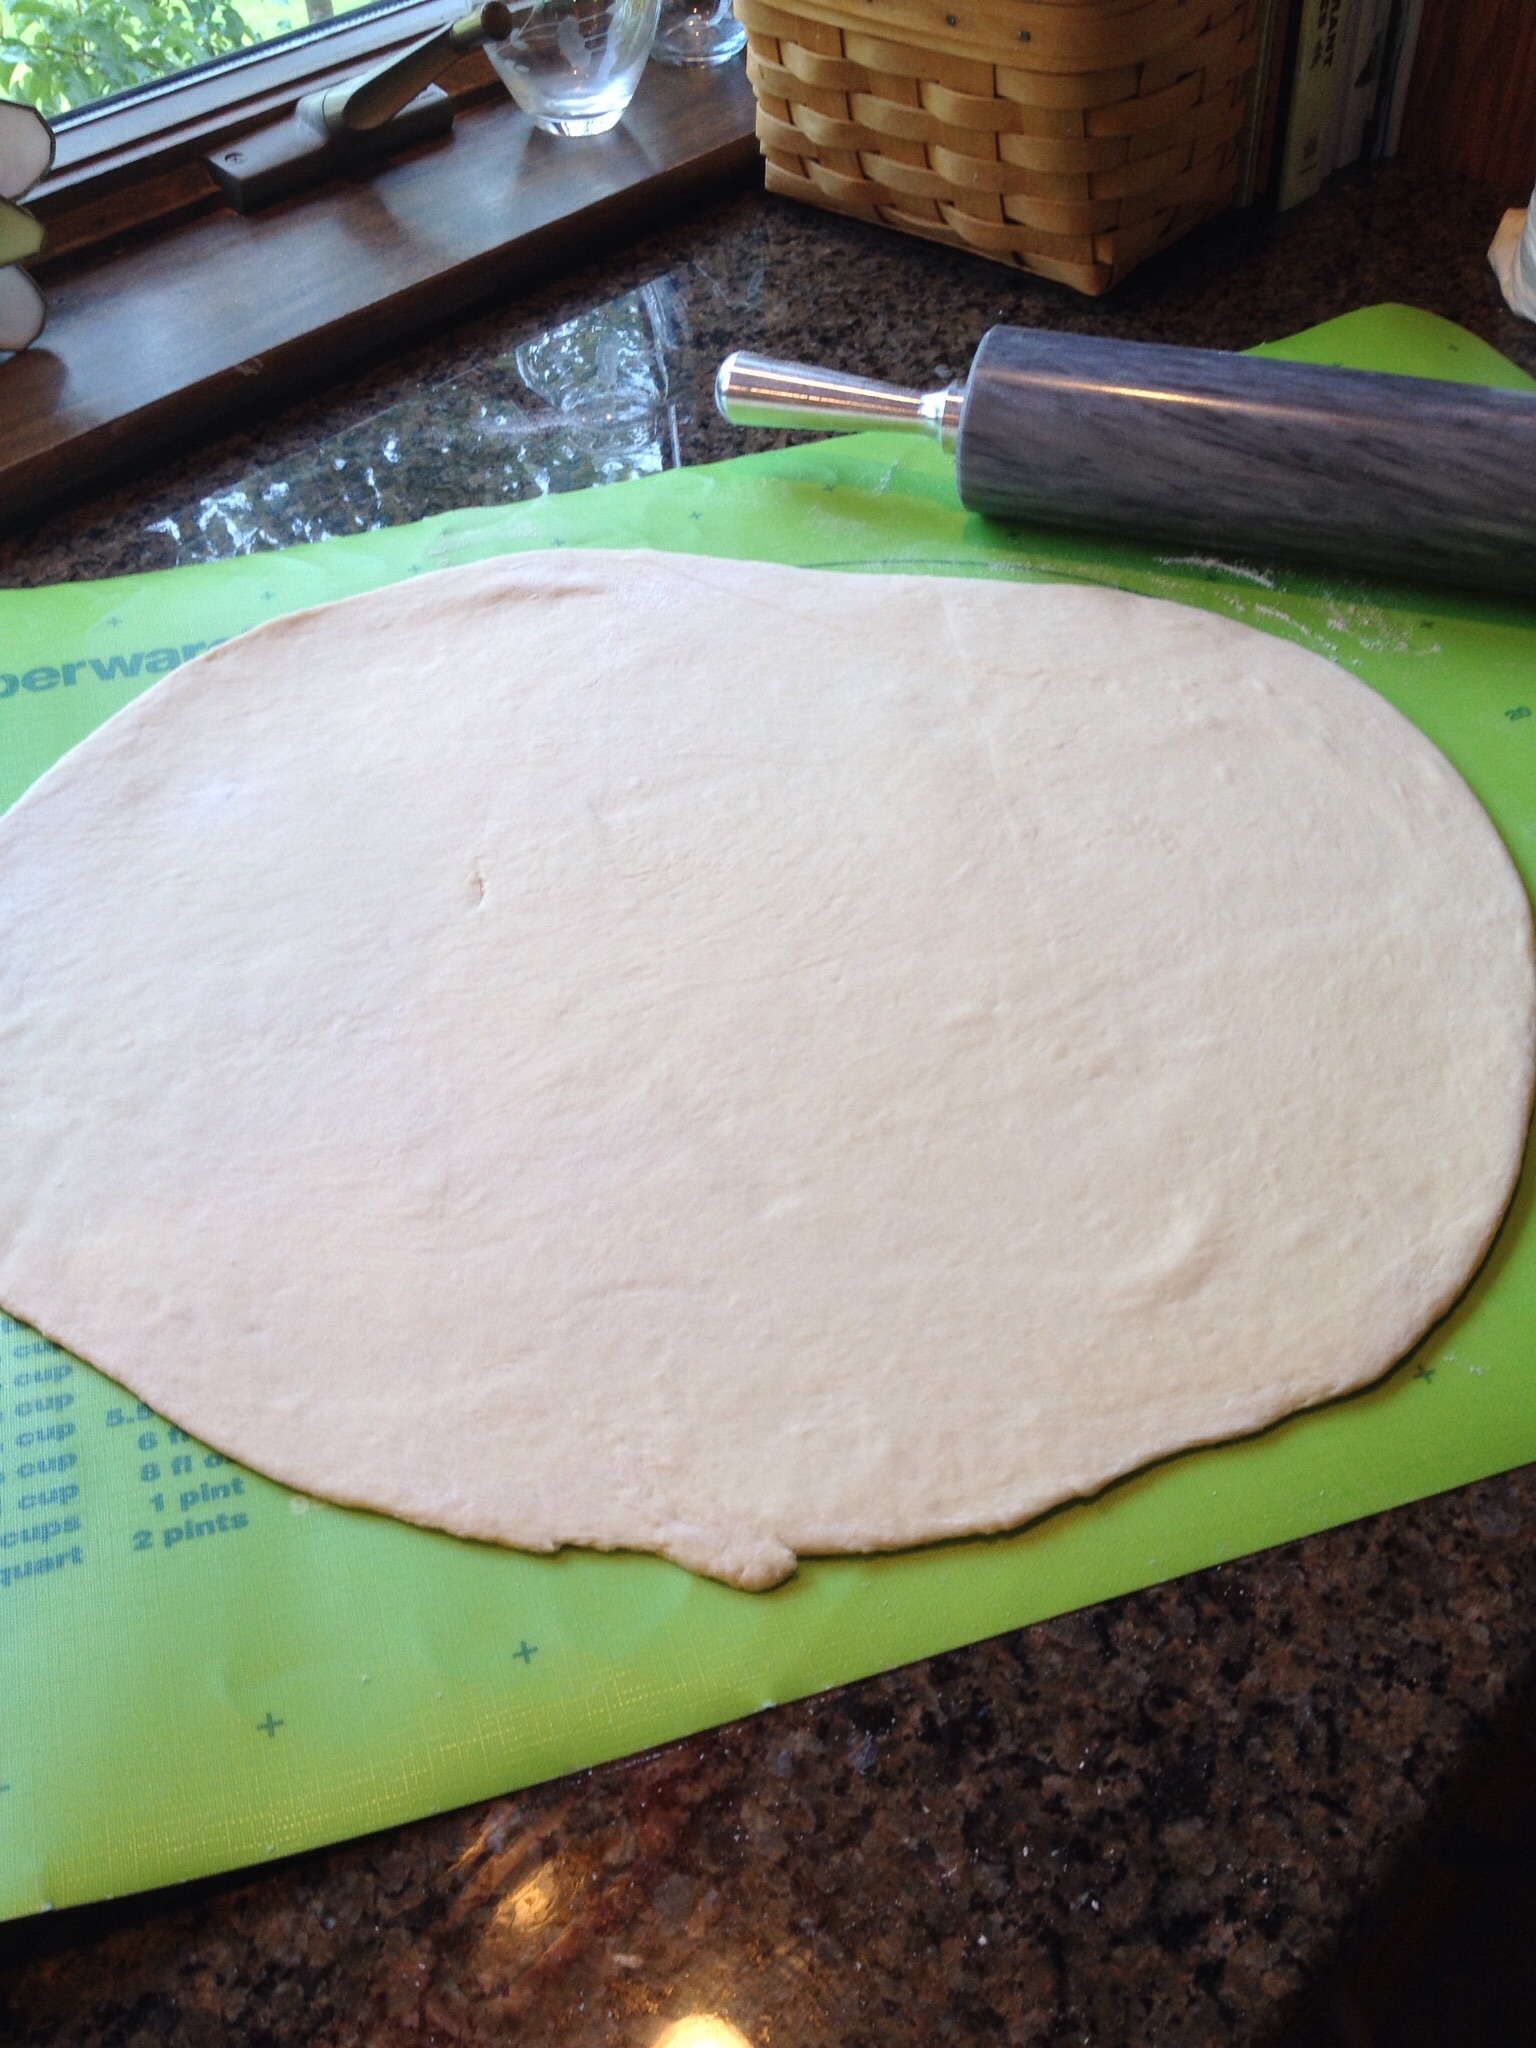
Grilled Pizza
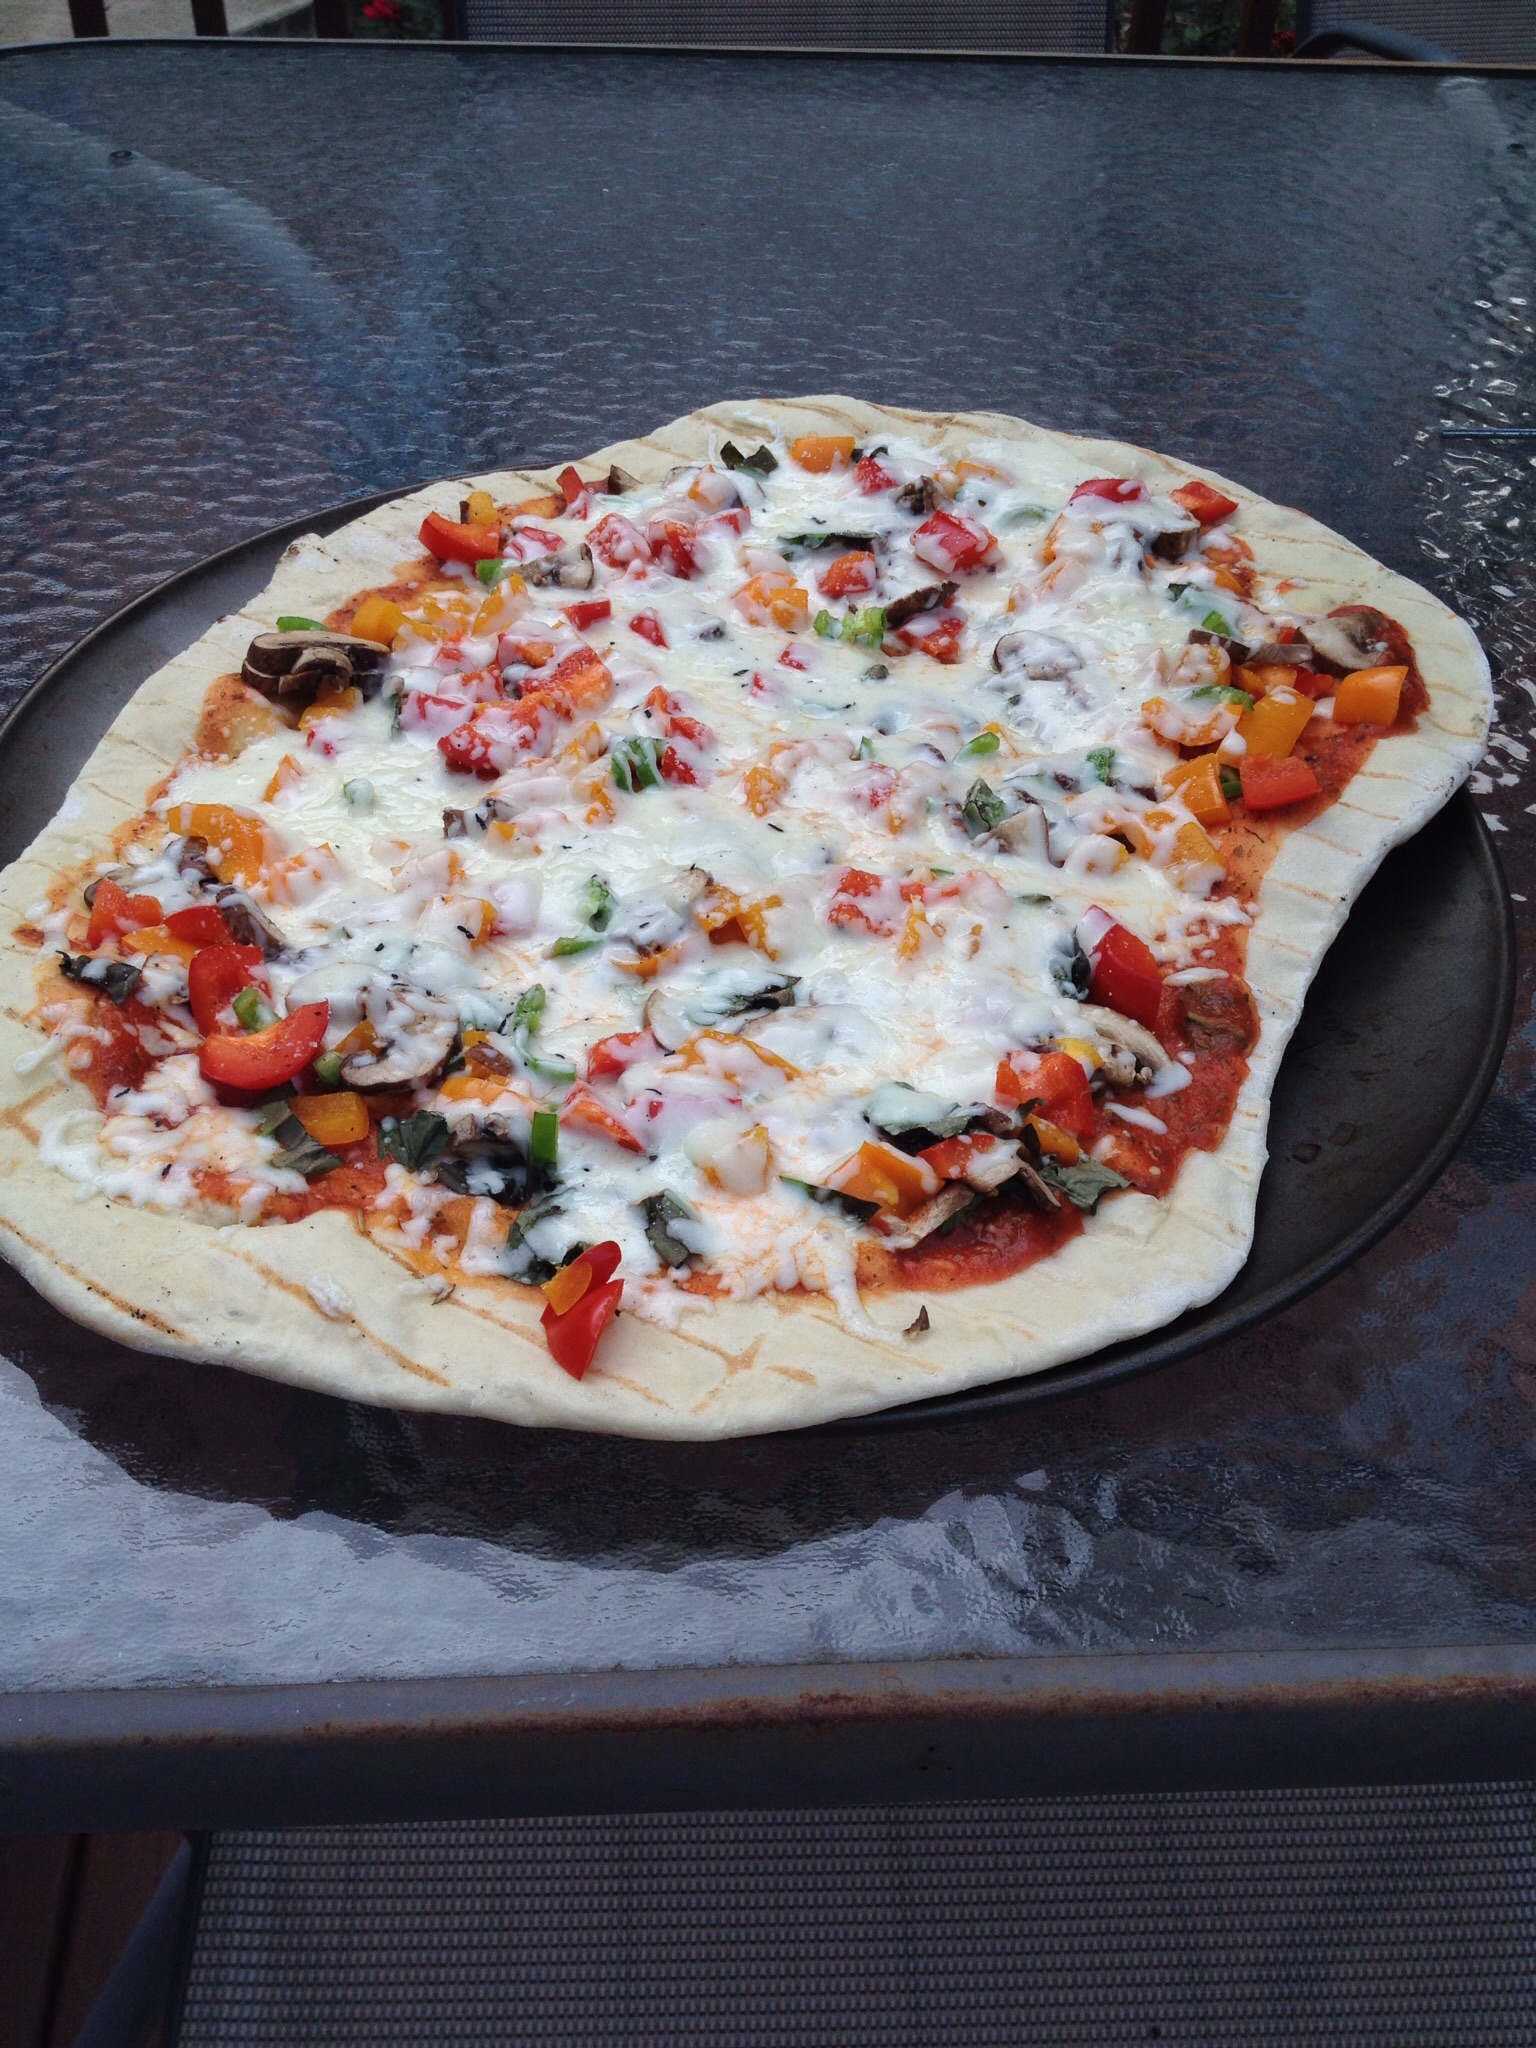
Summer is a great time to grill. While most people think of hot dogs and hamburgers, our family enjoys grilling pizza. That's right, pizza! During the time it takes to heat the oven to 450º, your pizza will be done. Ready for the plate, and ready to eat! It's important to use a crust recipe that is sturdy. The first couple of times of trying this out, I used my old stand-by crust. It works great in the oven, but was not sturdy enough for the grill. Here is one adapted from Allrecipes.com. It worked well with our pizza experience.
Pizza Dough (makes 2 pizzas)
1 TBSP active dry yeast 2 tsp. white sugar 2 cups warm water (110 degrees F) 5 cups all-purpose flour 4 TBSP olive oil 2 tsp. salt
Directions:
- In a medium bowl, dissolve yeast and sugar in warm water. Let stand until creamy, about 10 minutes.
- Meanwhile, prepare pizza sauce (if using) and have toppings ready.
- Stir in flour, salt, and oil. Beat until smooth using a stand mixer with dough hook attached. Let rest for 5 minutes.
- Turn out dough onto a lightly floured surface and roll into a round or square.
- Heat grill to 400 degrees. Clean off grates well.
- Lightly coat one side of the dough with olive oil and place oil side down onto grill. Lightly coat other side with oil and close lid. Cook for approximately one minute or until crust is bubbles up.
- Using two metal spatulas, carefully turn over pizza crust.
- Add sauce and toppings. Close lid. Cook for additional 2 minutes or until cheese melts.
- Repeat with remaining crust.


Mason Jar Salads
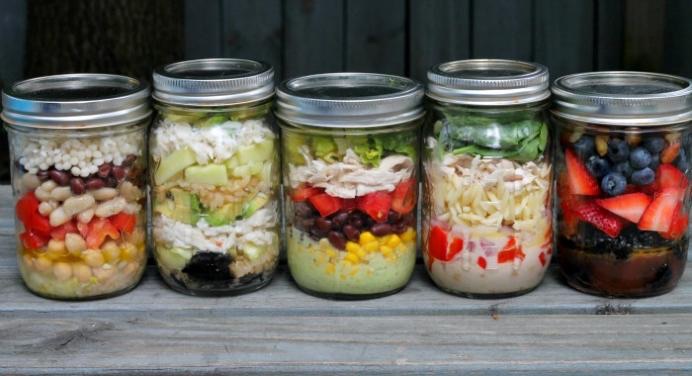
It's all the rage right now...mason jar salads. Many websites and books give information about how to build these convenient, nutritious salads. Mason jars come in different sizes, which means you can pack a large jar full of yummy nutrition. The prep time is the bummer, but the good news is you can pack four or five jars for the week and only prep once! If you are planning to eat the salads longer than two days, pack the dressing separately, otherwise you will add the dressing in the jar. If time is crunched, store bought dresssing will do, but it you have the time, making your own will save both money and calories. If watching calories, choose a vinegarette.
Mason jars are found in discount stores, hardware and some grocery stores. Choosing a plastic, reusable lid can also be purchased rather than using the lids and rings. This can further save you money in the long run. Once you have your jars and have decided how many salads you are packing for the week, it's time to get started.
Dressing Layer
It's all about the layers. Like I said, if the salads will be eaten within two days, start with the dressing in the bottom of the jar. Use about 2 tablespoons for a quart-sized jar and about 1 tablespoon for a pint sized jar.
Resilients
The next layer should contain vegetables that are more resilient to being packed like onions, green peppers, carrots, cucumbers, snap peas, or consider fruites like grapes or apples (if using apples sprinkle with lemon juice to prevent browning).
Protein
Pack some protien in over top of the resilient veggies to get some staying power from your meal. Choose protein like hard boiled eggs, chicken breasts, canned tuna or salmon, black beans or chickpeas.
Greens
The greens come next. Try to pack the greens as tight as you can to keep the resilients and protein from moving around. Skp the iceberg lettuce and choose nutritious greens like kale, spinach, or chopped romaine.
Toppings
Finish off the jar by adding your favorite toppings like bacon bits, nuts, seeds, dried or fresh berries, and sprouts. Croutons may absorb moisture, so you may want to pack those in a separate container.
Enjoy your salad by shaking it up and eating from the jar, or pour onto a plate. Remember to pack a fork!
health-bite: mason jars salads packed with nutrition

Black Bean Edamame Burger
When I made the decision to stop purchasing processed foods, I was faced with the reality that I would need to make my own veggie burgers. Packaged veggies burgers taste good and are extremely convenient. This was not going to be an easy transition. The search began to find a veggie burger that not only has great flavor, but stayed together. After trying many different recipes, I found this gem. Don't be intimidated by the list of ingredients. It's worth the effort. I typically double the recipe and freeze the majority of the burgers. That way I can have quick access during the week, when life gets its busiest.
![IMG_9668[1]](http://static1.squarespace.com/static/580f7c6ee4fcb54017efc28f/5810c01a1dd45429ef605292/5810c01f1dd45429ef605385/1477492767020/IMG_96681.jpg?format=original)
Black Bean Edamame Burgers
3 TBSP olive oil, plus extra for the baking pan
1/3 cup farro
1 onion, diced
2 garlic cloves, minced
3 medium carrots, shredded
16 ounces cremini mushrooms, stems removed, caps diced
2 15 1/2-ounce cans black beans
1 cup frozen edamame, thawed
1 tsp ground cumin
1 1/2 tsp chili powder
1 1/2 cups breadcrumbs
1 TBSP Dijon mustard
1 TBSP soy sauce
1/4 cup chopped cilantro, optional
1/4 cup chopped Italian parsley
1/2 tsp salt Pinch freshly ground pepper
2 large eggs, beaten
Directions:
Heat 1/2 TBSP of the olive oil in a medium saucepan. Add the farro and cook over medium heat, stirring, for 2 minutes. Add 1 1/2 cups of water and a pinch of salt, and bring to a boil. Cover and simmer the grains 20 minutes. If not yet al dente, simmer for another few minutes until desired texture is reached. Drain and set aside.
In a large skillet, heat the remaining 2 1/2 TBSP of olive oil. Add the onion and cook over medium heat until translucent, 8-10 minutes. Add the garlic and carrots and cook until fragrant, 2 minutes. Add the mushroom caps and continue cooking until softened, 2 additional minutes.
In a food processor, pulse all but 1/2 cup of the beans to a chunky puree; transfer to a bowl. Fold in the remaining 1/2 cups of beans, edamame, cooked farro, onion mixture, cumin, chili powder, bread crumbs, Dijon, soy sauce, cilantro, parsley, salt, and pepper. Taste and add more salt or seasoning as desired. Let the mixture cool until no longer steaming, then mix in the eggs. Cover and chill in the fridge for at least 30 minutes or up to 24 hour (this step helps the patties stay together.)
Preheat the oven to 400ºF. Line a baking sheet with nonstick liner or parchment. Using your hands, form the mixture into large patties (3 1/2"-4" in diameter, 3/4" thick) and lay them on the baking sheet several inches apart. Bake for 20 to 25 minutes or until the patties have browned slightly on top.
Yield: 6-8 patties depending on size

5-Minute Artisan Bread
There is nothing better than the smell of fresh baked bread. The pleasant smell that permeates through the house makes my mouth water. With my full time job taking me away from home during the day, it's difficult to find the time necessary to bake fresh bread. I try to give myself time during the weekend to bake several loaves of bread and then freeze at least one for a time when life gets too busy. I first heard about 5-Minute Artisan Bread from a patient who tried to stay away from processed foods. This is quick and easy recipe that works well during a busy week. The longer it sits in the refrigerator the more "sourdough" it tastes.
![IMG_9767[1]](http://static1.squarespace.com/static/580f7c6ee4fcb54017efc28f/5810c01a1dd45429ef605292/5810c01e1dd45429ef605383/1477492766978/IMG_97671.jpg?format=original)
5-Minute Artisan Bread
Ingredients:
Yield: 4 (1 pound) loaves
- 3 cups lukewarm water
- 1 1⁄2 tablespoons granulated yeast or 2 (7 1/4 g) packets granulated yeast
- 1 1⁄2 tablespoons kosher salt or 1 1⁄2 tablespoons other coarse salt
- 6 1⁄2 cups unsifted unbleached all-purpose flour (not strong)
Directions:
Warm the water slightly. It should feel just a little warmer than body temperature. Warm water will rise the dough to the right point for storage in about 2 hours. With cold water it will need 3-4 hours.
Add the yeast to the water in a 5 quart bowl or, preferably, in a re-sealable, lidded (not airtight) plastic food container or food-grade bucket. Don't worry about getting it all to dissolve.
Mix in the flour and salt - kneading is unnecessary. Add all of the flour at once, measuring it in with dry-ingredient measuring cups, by gently scooping up the flour, then sweeping the top level with a knife or spatula. Don't press down into the flour as you scoop or you'll throw off the measurement. Mix with a wooden spoon, a high-capacity food processor (14 cups or larger) fitted with the dough attachment, or a heavy duty stand mixer fitted with the dough hook until the mixture is uniform. If you're hand mixing and it becomes too difficult to incorporate all the flour with the spoon, you can reach into your mixing vessel with very wet hands and press the mixture together. Don't knead, it isn't necessary. You're finished when everything is uniformly moist, without dry patches. It takes a few minutes, and will yield a dough that is wet and loose enough to conform to the shape of its container.
Allow to rise. Cover with lid (not airtight or it could explode the lid off). Allow the mixture to rise at room temperature until it begins to collapse (or at least flattens on the top), approx. 2 hours, depending on room temperature, and initial water temperature longer rising times, up to 5 hours, won't harm the result.
You can use a portion of the dough any time after this period. Fully refrigerated dough is less sticky and easier to work with than dough at room temperature.
On Baking Day:
Prepare your loaf tin, tray, or whatever you're baking it in/on. Sprinkle the surface of your refrigerated dough with four. Pull up and cut of a grapefruit-size piece of dough (about 1 lb), using a serrated knife.
Hold the mass of dough in your hands and add a little more flour as needed so it won't stick to your hands. Gently stretch the surface of the dough around to the bottom on all 4 sides, rotating the ball a quarter-turn as you go. Most of the dusting flour will fall off - that's fine, it isn't meant to be incorporated. The bottom of the loaf may appear to be a collection of bunched ends, but it will sort itself out during resting and baking.
The correctly shaped final product will be smooth and cohesive. The entire process should take no more than 30 - 60 seconds.
Rest the loaf and let it rise in the form, on the tray/pizza peel, for about 40 minutes Depending on the age of the dough, you may not see much rise during this period. That's fine, more rising will occur during baking.
Twenty minutes before baking, preheat the oven to 450°F. Place an empty broiler tray for holding water on any other shelf that won't interfere with the rising bread.
Dust and Slash. Dust the top of the loaf liberally with flour, which will allow the slashing knife to pass without sticking. Slash a quarter inch deep cross, diagonal lines, or tic-tac-toe pattern on top using a serrated knife.
After a 20 minutes of preheat, you're ready to bake, even though the oven thermometer won't be at full temperature yet. Put your loaf in the oven. Pour about 1 cup of hot water (from the tap) into the broiler tray and close the oven to trap the steam (this is what makes the crust hard and the inside moist.)
Bake for about 30 minutes, or until the crust is nicely browned and firm to the touch.
Store the rest of the dough in the fridge in your lidded (not airtight) container and use it over the next 14 days. The flavor and texture improves, becoming like sourdough. Even 24 hours of storage improves the flavor.
Adapted from www.recipes.com
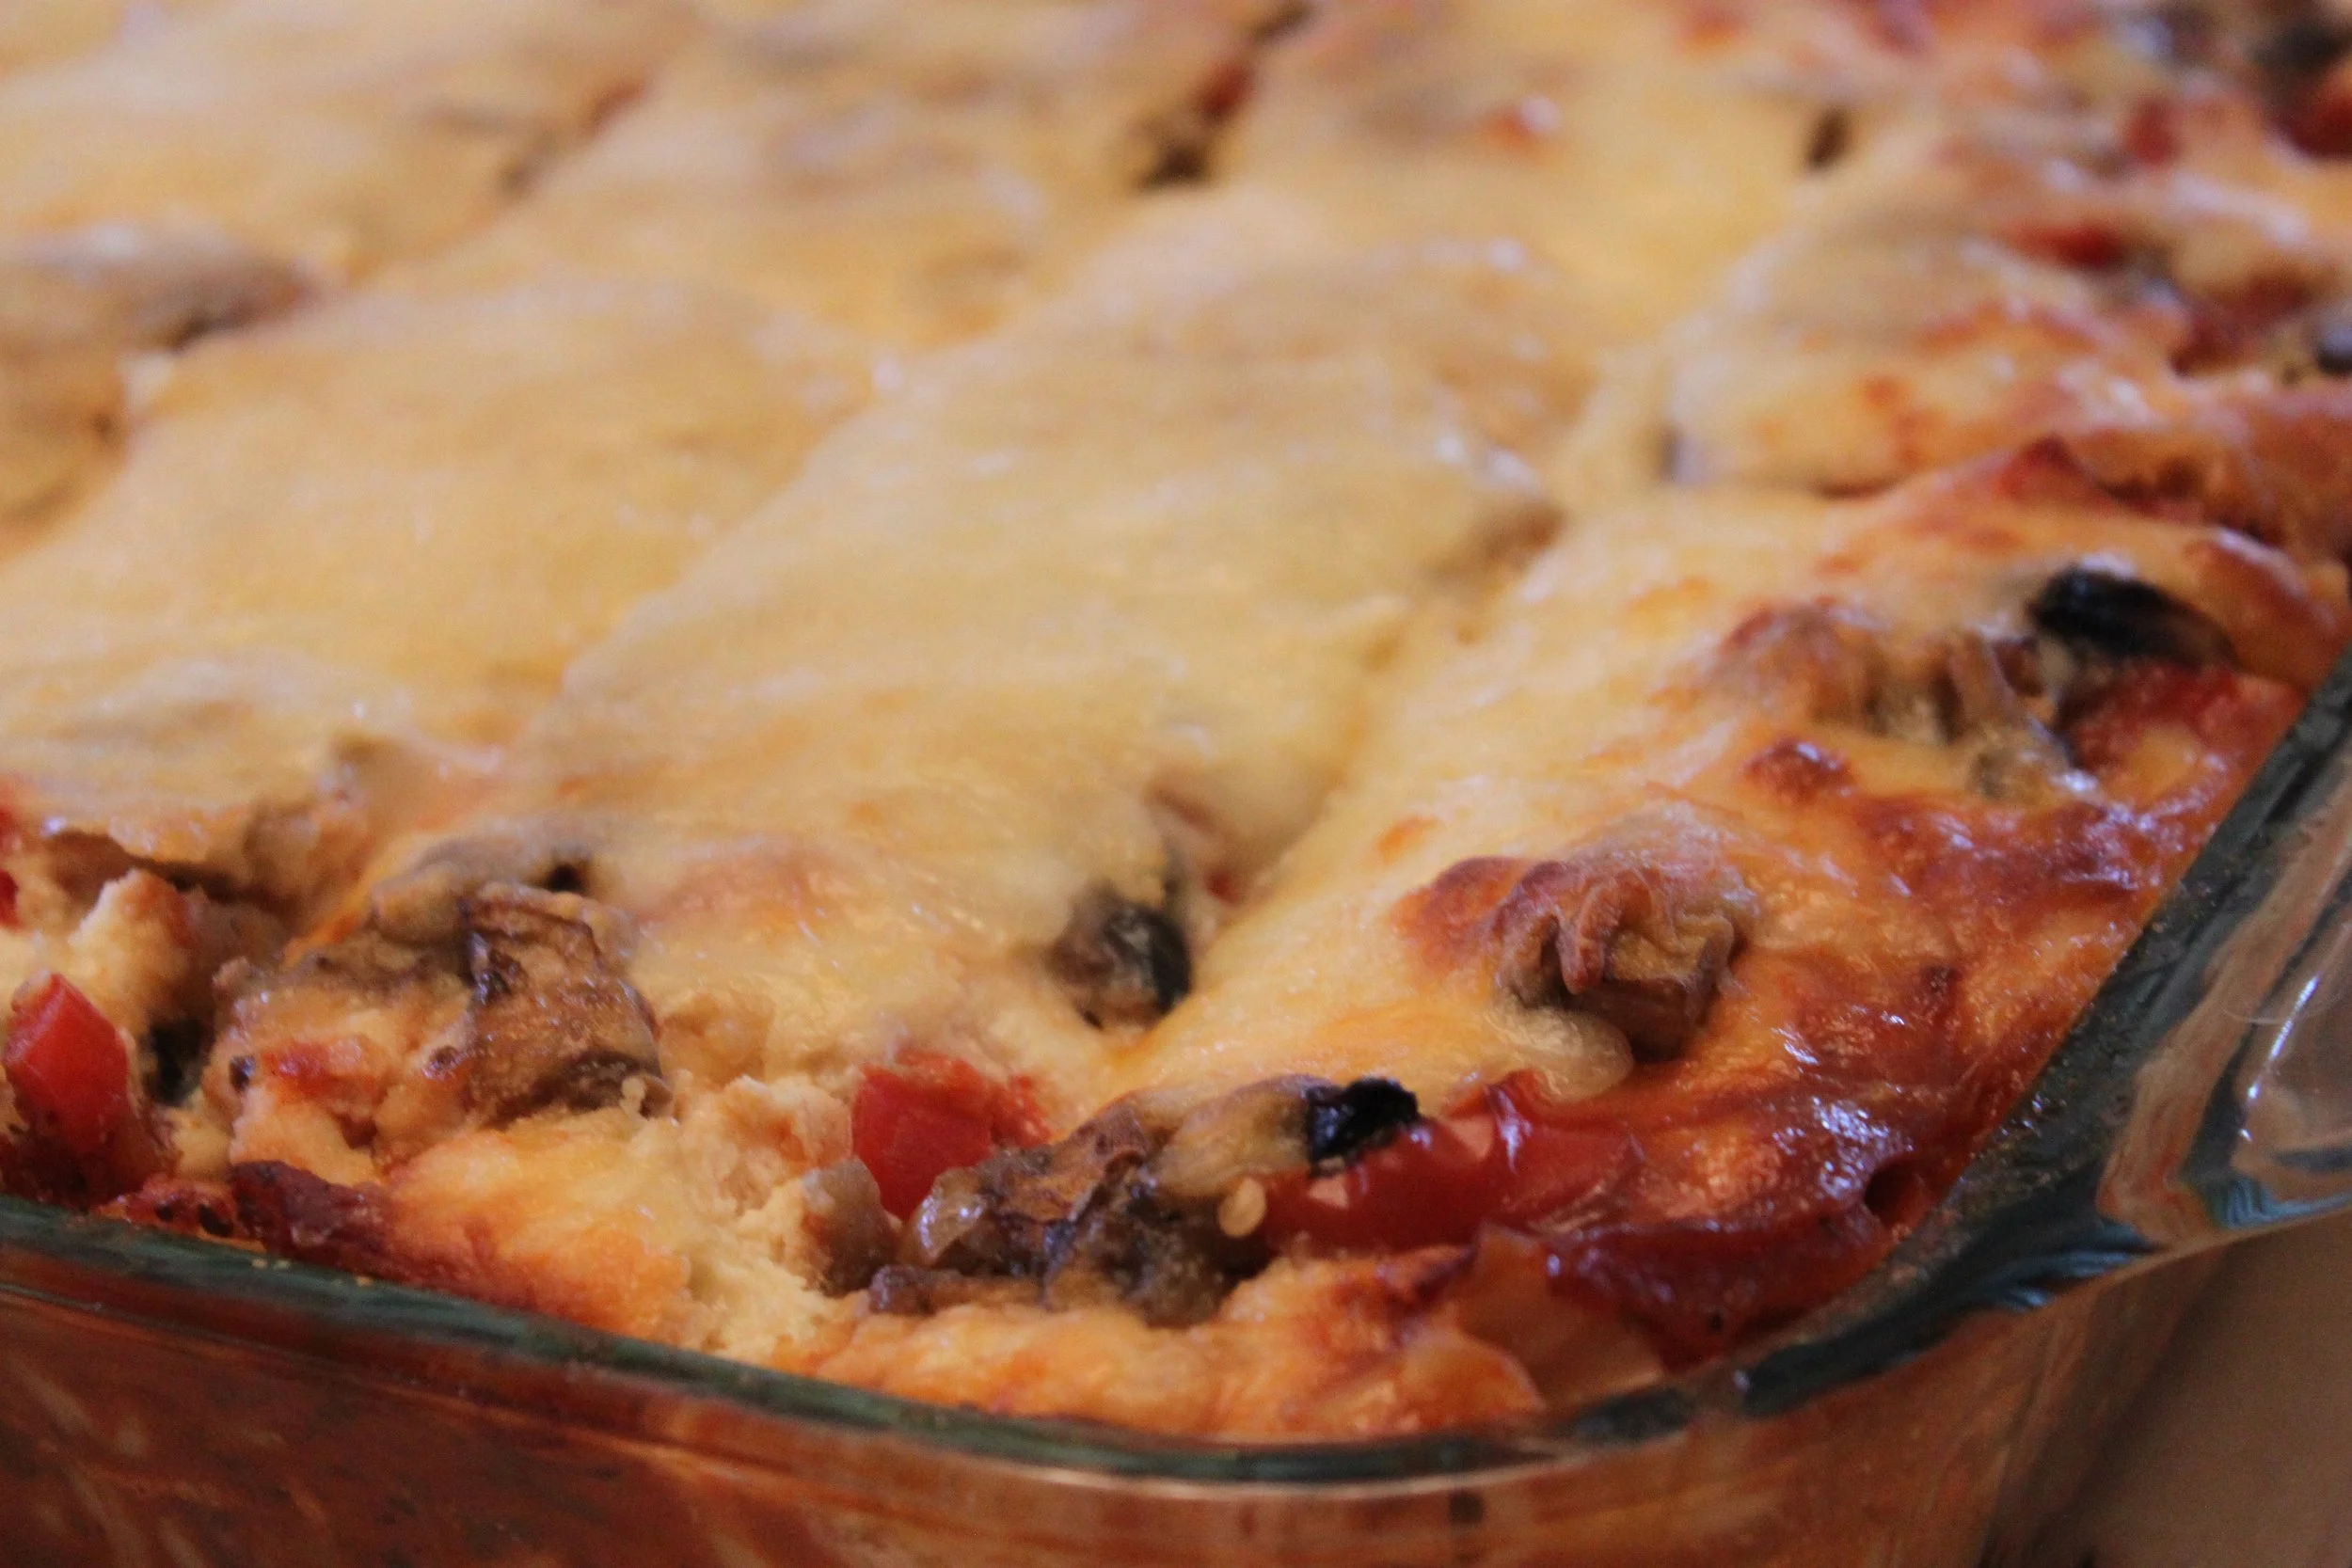
Vegetable Lasagna
![IMG_9723[2]](http://static1.squarespace.com/static/580f7c6ee4fcb54017efc28f/5810c01a1dd45429ef605292/5810c01e1dd45429ef60537d/1477492766832/IMG_97232.jpg?format=original)
Here is a recipe that I go back to time and time again. Lasagna is hearty and usually full of fat and calories. This version is no different, but the heartiness comes from all the beautiful vegetables instead of meat. If you are lucky, you'll have leftovers, which are more flavorful the next day. Feel free to mix up the vegetables and add ones your family likes. Sometimes I'll use cottage cheese instead of ricotta cheese.
Vegetable Lasagna
- 1 cup chopped red bell pepper (about 1 medium)
- 1 cup chopped yellow pepper (about 1 medium)
- 1 cup chopped onion
- 4 zucchini, halved lengthwise and thinly sliced (about 5 cups)
- 2 (8-ounce) packages of cremini mushrooms, sliced 2 cups
- (8-ounces) shredded part-skim mozzarella cheese, divided
- 1 1/2 cups fat-free ricotta cheese
- 1/2 cup (2-ounces) grated fresh Parmesan cheese, divided
- 1 large egg, lightly beaten
- 5 cups marinara sauce, divided
- 12 precooked lasagna noodles (about 8 ounces)
Directions:
- Preheat oven to 350º.
- Heat a large Dutch oven over medium-high heat. Coat pan with cooking spray. Add peppers and next 3 ingredients; sauté 10 minutes or until vegetables are crisp-tender and liquid evaporates. Add garlic, sauté 30 seconds.
- Combine 1 1/2 cups mozzarella, ricotta, 1/4 Parmesan, and egg, stirring well.
- Spread 1 cup marinara over bottom of a 13 x 9-inch baking dish coated with cooking spray, top with 3 noodles. Spoon 1 cup marinara evenly over noodles. Top evenly with one-third of ricotta mixture and one-third of vegetable mixture. Repeat layers twice, ending with noodles. Top with 1 cup marinara. Sprinkle evenly with 1/2 cup mozzarella and 1/4 cup Parmesan.
- Cover and bake at 350º for 45 minutes. Uncover and bake an additional 10 minutes or until cheese melts. Let stand 10 minutes. Yield 8 servings.
Calories: 378; Fat 11.4g; Protein 22.9g; Carb 46.5g; Fiber 5.9g; Chol 55mg; Iron 2.6mg; Sodium 667 mg, Calc. 434mg

Raw Brownies
![IMG_9761[1]](https://images.squarespace-cdn.com/content/v1/580f7c6ee4fcb54017efc28f/1477617782763-CZHKYEMT2KKMEC00XF5X/image-asset.jpeg)
Have you heard of the concept “eating raw”? What is eating raw? If you are like me, you are thinking salads, smoothies, or a veggie tray with dip. Many of us are already eating some raw. We enjoy slaws, fruit and salads. There are some who subscribe that the benefits of only eating raw foods are worth the extra effort, which mean the microwave, cook top and oven get a break. This sounds pretty good, right? No cooking? That should be a snap. Well, not really. Eating raw actually requires more cooking skills while utilizing small appliances. The practice of preparing foods with blenders, food processors, and dehydrators can be a bit overwhelming at first. Why would anyone what to create more work? Well, one of the main benefits of raw eating is the belief that cooking the foods kill the enzymes and nutrients our bodies need, and that causes health problems.
Recently, I purchased a book on eating raw. I was interested because I had heard that people who were diagnosed with cancer often could turn things around by eating “raw” or “juicing.” While there is no scientific evidence that supports this, there are survivors who swear it’s made a difference for them. So who am I to contradict that? They are alive when the doctor told them there were no other medical treatments left. I do believe in healthy skepticism. I don’t believe that there is only ONE way to eat, or only ONE diet plan to follow. But, maybe I can work in a little raw during the week that would benefit me and my family. Most Americans don’t get their daily allowance of fruits and vegetables anyway. So if I can trick my family into eating raw, especially desserts, then maybe they would be game. At least it’s a place to start.
According to my own research, eating raw could give the body a good energy boost and a good place to start for good health. It can lower the risk of certain cancers like, breast and colon. Eating raw means eating “clean” and I’ve heard a lot of people talking about wanting to eat “clean.” Having only tried a few of the recipes, I can tell you that what I made was surprisingly good. Even my skeptical husband liked the brownies I made. As a matter of fact, he finished the pan.
The down side is it can be expensive to eat raw, at least the desserts. The recipes I've tried contain dates, nuts, raw cashews, and pure maple syrup. While a better choice than their refined counterparts, I believe the cost is worth the consequence. I’m leaving you the recipe for the brownies our family enjoyed. This week, I plan to experiment more with raw. I’ll keep you posted.
![IMG_9759[1]](http://static1.squarespace.com/static/580f7c6ee4fcb54017efc28f/5810c01a1dd45429ef605292/5810c01e1dd45429ef605379/1477492766746/IMG_97591.jpg?format=original)
The Ultimate Unbaked Brownies
- 2 ½ cups loosely packed pitted dates
- 1 ½ cups walnuts
- ½ cup plus 2 TBSP cacao powder or unsweetened cocoa powder
- 2 tsp vanilla extract
- ¼ tsp salt
- ¼ cup pure maple syrup
- 2 TBSP melted coconut oil or vegetable oil
Directions:
- Combine dates, walnuts, 6 TBSP cacao powder, 1 ½ tsp vanilla, 2 tsp. water and salt in a food processor. Process until completely smooth.
- Lightly grease an 8-inch square baking dish, or line a dish with parchment or waxed paper. Transfer dough to dish. Press dough very firmly into dish with your hands until dough is evenly distributed.
- In a medium mixing bowl, combine remaining ¼ cup cacao powder, remaining ½ tsp vanilla, maple syrup and oil. Stir until mixture forms a paste (this is the frosting). Spread paste evenly over dough in baking dish. Refrigerate brownies for at least 2 hours to set, and then cut into squares. Refrigerate any leftovers in a covered container for up to 2 weeks or freeze up to 2 months.
Nutrition information per serving (1 brownie)
207 calories, 10g fat (2g sat), 0mg cholesterol, 5g fiber, 4g protein, 29g carb., 63mg sodium, 3mg iron, 39mg calcium.
adapted from
Choosing Raw
, by Gena Hamshaw

Confetti Kale Slaw
Here is a different twist on a summer salad that's not heavy in mayo and sugar. This recipe is from the Moosewood Restaurant, which is known to use fresh, local products in the town in which they reside, Ithaca, New York. The dressing in this particular salad is light with a nice mix of both sweet and tangy flavors. Colorful and fresh, it's sure to be a hit. This slaw is excellent beside a main dish that is rich and cheesy or paired with something spicy.
![IMG_9724[1]](http://static1.squarespace.com/static/580f7c6ee4fcb54017efc28f/5810c01a1dd45429ef605292/5810c01e1dd45429ef605375/1477492766659/IMG_97241.jpg?format=original)
Confetti Kale Slaw
Dressing:
- 1/2 cup orange juice
- 1/4 cup fresh lemon juice
- 1 TBSP apple cider vinegar
- 1/4 cup olive oil
- 1/4 tsp salt
- 1/4 tsp ground black pepper
- 1 large firm apple, shredded (about 1-2 cups)
- 1 cup shredded green or red cabbage
- 1 cup shredded carrots
- 1 cup minced celery
- 1/4 cup minced scallions
- 3 cups shredded kale, packed
Directions:
- To make the dressing: whisk together the orange and lemon juice, vinegar, olive, oil, salt and pepper in a large bowl.
- Prepare the apple and vegetables and place them in the bowl as you go: peel or don't peel the apple but shred it with a large-holed hand grater. To prevent the apples from during brown, toss them well with the dressing. Thinly slice the cabbage and then cut across the slices about every inch. Peel the carrots and shred on the large-holed side of the hand grater. Mince the celery. Mince the scallions.
- To shred the kale: rinse the kale leaves and shake off excess water. Strip the leaves from the large stems and pile on a chopping board. Gather the kale into a compact mass and thinly slice it. Then cut down across the slices, chopping the kale into 1- to 2- inches. Add the shredded kale to the bowl and toss well.
- Delicious served right away, but the sweetness intensifies as it sits. This slaw will keep in the refrigerator for 2-3 days.

Garlic Hummus
![IMG_9721[1]](http://static1.squarespace.com/static/580f7c6ee4fcb54017efc28f/5810c01a1dd45429ef605292/5810c01e1dd45429ef60536d/1477492766259/IMG_97211.jpg?format=original)
There are phases I go through with eating. Sometimes I'm on a kick with guacamole and tortilla chips. Other times it's hummus. One day, I shared with a friend and co-worker how much I loved hummus, but the recipes I'd tried at home just wasn't creamy enough for me. I preferred the store bought type. She shared with me her recipe, and I've been making it ever since. I've also experimented with adding roasted red peppers and avacados. All of which have been very good. The addition of yogurt, I beleive with the secret to the creaminess I was looking for. Personally, I use the greek yogurt for additional protein.
Garlic Hummus
1 15 oz can chickpeas, rinsed and drained
2-3 large garlic cloves
4 TBSP fresh lemon juice
2 TBSP olive oil
3 TBSP tahini
1/2 tsp ground cumin
1/2 - 1 tsp salt
1/2 cup plain yogurt
Directions:
- Puree peas along with garlic in food processor.
- Add remaining ingredients and blend until smooth.
- Taste and adjust seasons by adding more garlic, cumin, lemon juice, or salt.
- Transfer to serving bowl and cover.
- Refrigerate until ready to serve.
Serve with fresh vegetables such as cucumbers, carrots, celery, and peppers.

Egg Rolls
Growing up, I didn't have the opportunity to experience many culturally diversed foods. As an adult, I became brave enough to try foods that, to me, were very different from the American, southern cooking I was accustomed too. The first time I made my own egg rolls, I expected a complete failure, however, they turned out better than expected. Egg rolls really are not difficult to make. I have a Vita-mix that chops the veggies very quickly. Even with chopping by hand, these egg rolls can be ready in about 30 minutes. Of all the recipes I've tried, I like this one the best. I hope you will too.

Egg Rolls
4 TBSP vegetable oil
2 tsp grated fresh ginger
4 cloves garlic, finely chopped
4 scallions, sliced thinly
2 carrots, chopped
2 cups Napa cabbage, shredded
1/2 cup vegetable broth
4 TBSP soy sauce
2 TBSP sugar
3 TBSP sesame oil
15 egg roll wrappers
20 shrimps, cooked and minced (optional)
Directions:
In a wok or skillet, stir-fry the ginger and garlic in 2 TBSP of oil until fragrant. Add scallions, carrots, and red peppers and stir-fry over high heat for 2 minutes.
In a bowl, combine the broth, soy sauce, and sugar. Add the Napa cabbage and broth mixture. Bring to a boil and simmer 5 minutes, stirring occasionally, until the vegetables are soft. Add sesame oil, cool for at least 15 minutes, and strain. Fold in shrimp, if using.
Fill and roll the egg roll wrappers, using 2 generous TBSP of filling for each roll. Working with 1 wrapper at a time, place the wrapper with one corner of the diamond closest to you. Place 2 TBSP of the filling in the center of the wrapper. Roll the corner closest to you over the filling. Brush the top of the corner with water. Fold in the sides of the wrapper and continue rolling the egg roll up until it is closed. Press to seal, set aside, and continue with the remaining ingredients.
In a skillet set over med-high heat, heat remaining oil and sauté the egg rolls until golden brown on all sides, using tongs to turn them. Serve when cool enough to eat.
Dipping sauce:
1/3 cup soy sauce
1/3 cup rice vinegar
1 TBSP honey
1-2 tsp sesame oil
pinch of red pepper flakes

Low Fat Chocolate Zucchini Bread
When my youngest daughter was small, she would ask for "bikini" bread! My mother was always kind enough to accommdate this small request and enjoyed declious, sweet bread. Most sweet bread recipes call for a lot of oil, which turns me off in baking this type of bread for my family. However, because of the addition of applesauce in the recipe, the fat is marginal in this moist dessert. The chocolate satisfies those cravings for those of us who need a little chocolate from time to time. Enjoy!
![IMG_9704[1]](http://static1.squarespace.com/static/580f7c6ee4fcb54017efc28f/5810c01a1dd45429ef605292/5810c01e1dd45429ef605361/1477492766015/IMG_97041.jpg?format=original)
Low Fat Chocolate Zucchini Bread
- 3/4 cup sugar
- 3 TBSP vegetable
- 2 large eggs
- 1 cup applesauce
- 2 cups all-purpose flour
- 2 TBSP unsweetened cocoa
- 1 1/4 tsp baking soda
- 1 tsp ground cinnamon
- 1/4 tsp salt
- 1 1/2 cups finely shredded zucchini
- 1/2 cup semisweet chocolate chips
- cooking spray
Directions:
- Preheat oven to 350°
- Place first 3 ingredients in a large bowl; beat with a mixer at low speed until well blended. Stir in applesauce.
- Combine flour and the next 4 ingredients (through salt), stirring well with a whisk. Add flour mixture to sugar mixture, beating until just moist. Stir in zucchini and chocolate chips. Spoon batter into a 9x5-inch loaf pan coated with cooking spray. Bake at 350º for 1 hour or until a wooden toothpick inserted in center comes out almost clean.
- Cool before serving.
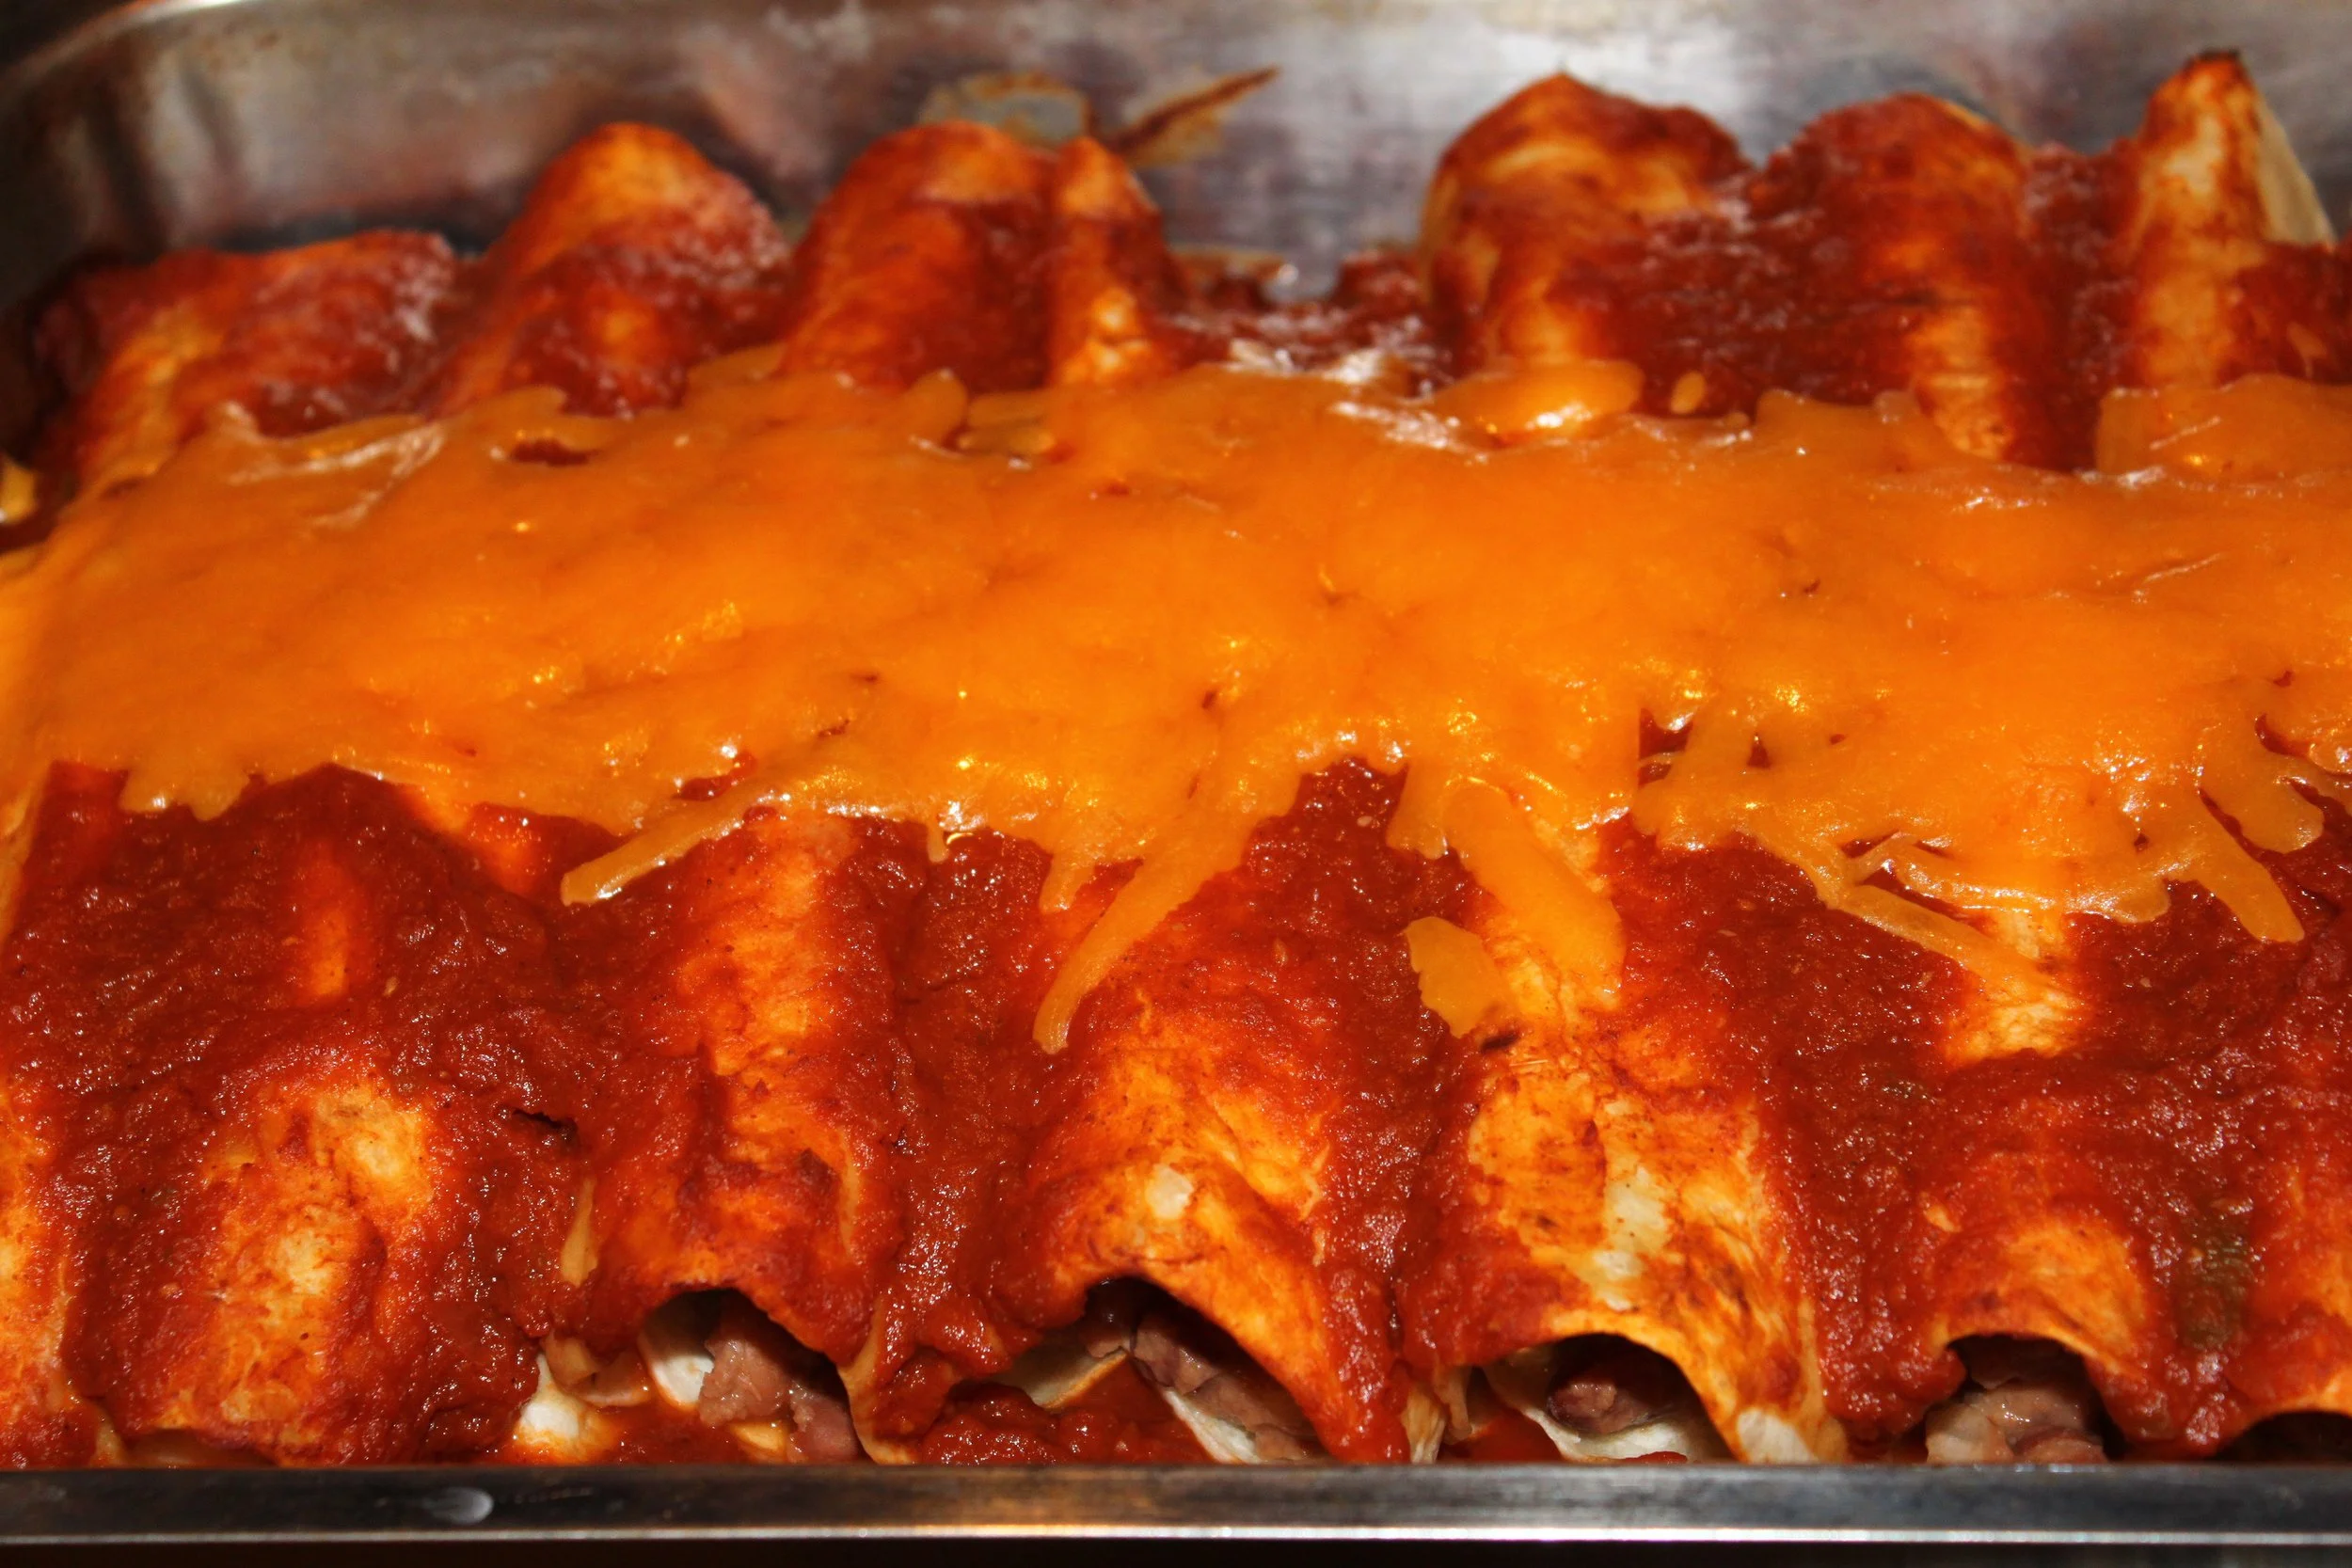
Easy Enchilladas
![IMG_9702[1]](http://static1.squarespace.com/static/580f7c6ee4fcb54017efc28f/5810c01a1dd45429ef605292/5810c01e1dd45429ef605363/1477492766056/IMG_97021.jpg?format=original)
Here is a quick and tasty enchillada dish that's a keeper on a busy work night. Feel free to substitue cooked ground beef seasoned with taco seasoning in place of the beans.
Easy Enchilladas
2 cans refried beans 1 small onion, chopped 1/2 cup shredded Montrey Jack cheese 8 flour tortillas 2 cups prepared enchillada sauce 1/2 cup shredded cheddar cheese
Directions:
Preheat oven to 350º. Place 1/4 cup enchillada sauce in 9x11 baking pan and set aside. In a medium bowl combine refried beans, onion, and Montrey Jack cheese. Divide filling between 8 flour tortillas. Roll up totillas, place seam side down in baking dish. Top with remaining enchillada sauce. Cover with aluminum foil and bake for 20 minutes. Uncover, sprinkle with cheddar cheese and cook an additional 10 minutes.